Sunday, December 8, 2013

Shrimp Laksa

We just had a fantastic week with good friends visiting from Melbourne, soaking up the Sydney sun on various beaches and eating and drinking a little too much at some of our favorite spots. Tonight called for a bit of a detox, something light but vegetable-heavy. I thumbed through some cookbooks and came across a bookmarked recipe in The Best of Bill Granger for Light Laksa. I've been meaning to try it, and the hubs agreed this was just the kind of thing we were after. We changed up the recipe to suit what we had on hand and our preferences, and the result was delicious. Best of all, it came together in about 30 minutes flat.
Shrimp laksa, infused with red curry, coconut, and ginger 
This Malaysian-style soup is not too spicy at all, it's filling and hydrating, and it's chock-full of veggies and protein-rich shrimp. It's the kind of soup that requires a spoon and a fork (or chopsticks). First date food it is not... we'll be washing the placemats tomorrow, and I had to give the table a pretty thorough wipe-down after we splattered soup all over ourselves and the surrounding perimeter of our bowls.
Shrimp laksa full of vegetables: bok choy, bean sprouts, mushrooms, and eggplant
with ginger and mukrat lime leaves
You could easily leave the shrimp out if you're looking for a vegetarian version, or try subbing cubes of firm tofu. Makrut lime leaves are easy to come by in Sydney at our local fruit and veg shop. I'm not sure how accessible they are elsewhere, but ask your grocer if they stock them, as they really are key in bringing all the flavors together. This laksa would be welcome during the icy weather up in the northern half of the world at this time of year, and perfect anytime down in the south. I leave you with warm wishes and the rosy pink tulips our friends left us with before they returned to Melbourne yesterday...
Christmas time = tulip season in Australia


Shrimp Laksa
inspired by The Best of Bill Granger
serves 4

2 cups chopped eggplant
1 cup sliced mushrooms
2 teaspoon rice bran oil (or other vegetable oil; divided use)
1 tablespoon Thai red curry paste
4 cups reduced sodium vegetable broth
2/3 cup coconut milk 
6 makrut lime leaves (3 whole leaves, and 3 leaves thinly sliced for garnish)
1-inch piece of fresh ginger, peeled and finely chopped
1/2 pound shrimp, peeled and deveined
8 bunches baby bok choy
2 cups bean sprouts
2 cups prepared thin rice noodles (vermicelli noodles)

To serve:
2 tablespoons light brown sugar
lime slices
3 kaffir lime leaves, thinly sliced
fish sauce (optional)

Heat a wide sauté pan over medium-high heat. Coat the bottom of the pan with 1 teaspoon oil, and add the eggplant and mushrooms. Sauté until softened and eggplant is cooked through, about 6-7 minutes.

Meanwhile, heat a large pot over medium-low heat. Coat the bottom of the pan with the remaining 1 teaspoon oil. Add the red curry paste, and stir around with a spatula until fragrant, about 1 minute. Add the vegetable broth, coconut milk, ginger, and the three whole lime leaves. Turn the heat up to high, and bring the broth mixture to a slow simmer, stirring occasionally. Simmer for 3-4 minutes to let the flavors infuse.

Add the shrimp and the cooked eggplant and mushrooms to the broth mixture. Continue to simmer until the shrimp turn pink, about 3-4 minutes. Turn the heat down to medium, and add the baby bok choy and bean sprouts, stirring carefully until the bok choy leaves begin to soften, about 2-3 minutes.

Distribute the prepared rice noodles into four bowls, and ladle the laksa over the noodles. Serve immediately with bowls of brown sugar, lime slices, thinly sliced lime leaves, and fish sauce, allowing everyone to season their laksa to taste. (We found that about 1/4 to 1/2 teaspoon of brown sugar was plenty; add a couple drops of fish sauce if you think it needs to be saltier; the sliced lime leaves are a must!)

Sunday, December 1, 2013

Thanksgiving down under

Happy December, all. I hope all the American folks had wonderful Thanksgiving celebrations, at home or abroad, with family or friends. For the first time since we've lived in Sydney, we had friends visiting during Thanksgiving, so it was a treat to invite them over for a friendsgiving feast. Each of us contributed a family recipe, and the results were delicious. 
Thanksgiving dinner 2013: a delicious combination of family recipes
from friends visiting Sydney
Besides turkey baked with a paprika dry rub, my mom's cornbread dressing, mashed potatoes and turkey gravy, roasted brussels sprouts with lemon mustard parsley dressing (from the great White on Rice Couple blog), and my friend's great-grandmother's sweet potatoes topped with brown sugar-pecan streusel, we also had some mouth-watering desserts. 
chocolate chip pecan pie, mini and uber-mini pumpkin pies, vanilla bean whipped cream
Instead of one big pumpkin pie, I made a few personal servings in 4-ounce le cruset dishes and mini-pie-shots in espresso mugs-- these topped by a dollop of my friend's vanilla whipped cream were just right... paired slices of her boyfriend's homemade chocolate chip pecan pie (sans corn syrup!).  
gooey chocolate chip pecan pie (no corn syrup here!),
and an espresso-sized shot of pumpkin pie with vanilla bean whipped cream
More importantly than enjoying some fantastic food, however, we all learned a little more about each other through the shared family recipes, which sparked conversations about quirky traditions and stories from Thanksgiving holidays past. I haven't spent Thanksgiving with my family in Texas in nine years, but have had some great meals with friends in England and Australia every year abroad. This year might have been one of my favorites. 

Thankful for friends and family, and the incredible people I've been able to meet (and food I've been able to eat!) in my expat travels over the last decade. And thankful for you for stopping by-- may you continuously find things for which you are thankful wherever life takes you.

Friday, November 22, 2013

Banana granola with raisins & walnuts

I haven't bought cereal in a while now, reaching instead for homemade granola with yogurt or milk and my morning coffee. I love the recipe I began making about a year ago, which gets its crunch from the addition of a whipped egg white (tip courtesy of the Smitten Kitchen Cookbook). But recently we had a few very ripe bananas, and instead of baking a loaf of banana bread, I decided to mash one into our weekly granola. Best decision!
naturally sweetened banana granola
full of grains and protein = happy start to the day
The consistency of the banana, mixed with a little tahini, oil, and honey, resulted in a perfectly crunchy, clumped together granola, without the addition of a whipped egg white. I added raisins and chopped walnuts after baking the granola, which gave it just the right level of sweetness and crunch. Feel free to leave out the coconut if that's not your bag, and to use peanut or another nut butter instead of tahini (ground sesame seeds) if you'd like. I've also used coconut oil in place of the rice bran oil, which is delicious. The ground flaxseed and chia seeds, along with the oats, add plenty of protein and fibre-- this stuff will keep you full till lunchtime. 
oats, ground flaxseeds, chia seeds, and coconut with banana, tahini, and honey
I'm also planning to try a sweet potato or pumpkin version of this granola later this month (just in time to cure any ex-pat Thanksgiving blues!)... I imagine a mashed sweet potato / pumpkin will offer a texture and sweetness similar to the banana in this recipe. I hope you enjoy this version as much as we did: the hubs has dubbed it the best granola yet.

Banana granola with raisins & walnuts
makes about 3 cups

1 large ripe banana (or 2 small bananas), mashed (about 3/4 cup)
1 tablespoon oil (rice bran oil or coconut oil work well)
1 tablespoon tahini (or peanut butter, almond butter, etc)
1 tablespoon honey
1/4 teaspoon ground cinnamon
pinch of freshly ground sea salt
3 cups rolled oats (not instant)
1/4 cup shredded coconut (unsweetened)
1/2 cup ground flaxseed
1/4 cup chia seeds
1/2 cup raisins
1/2 cup coursely chopped walnuts

In a large bowl, combine the banana, oil, tahini, honey, cinnamon, and salt. Stir well to combine. Add the remaining ingredients, and stir well so that everything is evenly coated in the banana mixture.

Spread the mixture evenly onto a large cookie sheet (or two medium sized cookie sheets). Bake at 150C / 300F for 30-35 minutes, or until lightly golden, taking the tray out halfway through the baking time to flip the granola over with a large spatula and stir it around a bit on the cookie sheet so that it bakes evenly. 

Remove from oven and allow to cool, then sprinkle the raisins and walnuts over the granola. Store in an airtight container for up to two weeks.

Sunday, November 3, 2013

Japanese oatmeal with sesame & miso

This riff on miso porridge is one I have been mulling over for a while now and have been working up the courage to try. I knew the hubs would melt over the idea of a savory oatmeal seasoned with miso, as we're always having the savory/sweet breakfast food debate on the weekends. He prefers savory, my ideal is slightly sweet. Our compromise is usually pancakes with fried eggs on the side. But salty miso oatmeal, when my favorite version is a cinnamon-spiced mixture sweetened with a little honey or brown sugar (and preferably some roasted pumpkin thrown in), was going to be all him.
plain yogurt, toasted walnuts, sliced radishes = perfect miso oatmeal stir-ins
However. This recipe blew my socks off. The flavor is stunning, satisfying.  The cool radishes and toasty walnuts, stirred in with a little creamy yogurt on top of the salty oats, are the most delicious combination. The hubs wants to experiment with a poached egg on top, too, though we haven't yet ventured that far (he has done so now, and it is delicious!).

sesame oil toasted oats with miso make a satisfying, flavorful oatmeal
We've also discovered that thinly chopped celery and baby bok choy are very tasty additions. Chopped fresh herbs (parsley, basil, or dill) and toasted sesame seeds would also be great add-ins. If you don't have sesame oil on hand to toast the oats in the first step, use olive oil or butter instead. But make sure you toast them, it adds a rich, deep flavor to the finished bowl.
miso oatmeal topped with sliced celery and baby bok choy, with yogurt and toasted walnuts
It's going to take many more batches of Japanese oatmeal (as we've started calling it) until I grow tired of it and turn back to the sweeter variety. Trust me, you need to try this at least once. And somehow this seems the perfect breakfast for either the cooler fall whether you Northern hemisphere folks are experiencing, or our hotter, summery days down here in the southern half of the world. Happy November, all. 

Japanese Oatmeal
2 servings
inspired by 101 Cookbooks

3 teaspoons sesame oil
1 1/4 cups oats (make sure they're gluten-free if your cooking g-f)
2 cups water
2-3 teaspoons miso (I used shiro/white miso)

A selection of toppings to serve:
2-3 tablespoons plain/greek yogurt
1/3 cup chopped, toasted walnuts

1 thinly sliced large radish
1 5-inch piece of celery, thinly sliced
1 bunch baby bok choy, thinly sliced


Place a medium-sized pot on the stove and bring to medium-low heat. Add the sesame oil and swirl to coat the bottom of the pan. Add the oats, and cook, stirring occasionally to coat in the sesame oil, for about 6-7 minutes, until they have taken on a slight, light golden color and toasted scent. Add the water to the oats and bring to a slow simmer. Cook the oats, stirring occasionally, until the water is absorbed, about 6-7 minutes.

Place the miso in a separate small bowl, and add a few spoonfuls of the cooked oats to the miso. Stir to combine. Add this oat-miso mixture back to the cooked oats, and stir gently to evenly combine. Taste and add up to another teaspoon of miso if necessary. Remove oats from heat.

Serve immediately with a small dollop of yogurt, the chopped, toasted walnuts, and whatever other toppings you desire (thinly sliced radishes, celery, baby bok choy, etc). 

Wednesday, October 30, 2013

Moving house & international travel break

September came and went in a flash. We packed up and moved (still here in Sydney), then unpacked to repack and fly to Europe for a three-week stay in England and France.This trip was chock-full of family events, quick visits with friends, work for me, and a flying 48-hour sojourn to Paris for just the two of us to celebrate our wedding anniversary taking place when both of us were in the same country for the first time (not to mention work for me in London and Cambridge). Although not a relaxing vacation, it was a treasured time, and we got to catch up with lots of people we love, visit places we know well, and also see some new things together.

In Paris, the hubs was delighted to dine on snails, horse, wood pigeon, pigs' trotters, cheese, etc...
I ate enough pastries to tide me over till we're there next....
 

We enjoyed a beautiful anniversary meal at Le Timbre (highly recommended). And we loved wandering around the left bank, visiting the places where the writer ex-pats of the 1920s lived, ate, drank, and worked.
 

Back in Australia, and October has come and gone just as quickly. The new apartment is fully unpacked and mostly organized, and I'm getting the hang of the new kitchen arrangement and older/smaller-model oven/stovetop. We've hosted our first international guests in our new place (brother and sister-in-law!), and are looking forward to seeing some more friends and family come through Sydney in the next few months.

When they came to stay with us, my wonderful brother and sister-in-law brought me the cookbook for their favorite bakery in San Francisco, Miette. I road tested some of the cake and frosting recipes last weekend to make cupcakes for a barbeque (Sydney summer is on the horizon!), and they were a huge success.  More complicated than your typical cake recipe, they involved steps such as pressing the ingredients through a sieve after having mixed together the cake batter-- a step that produced an incredibly even and tender crumb in an already deep, dark, delicious chocolate cake recipe. The European buttercream recipe was perfect, and worked beautifully with creative stir-ins for a range of flavors (chocolate-orange-bourbon; strawberry-vodka; margarita; and cappuccino). Look for Miette-inspired recipes to come.
Recipe post to follow this weekend, but just wanted to round up the many events that have delayed posting over the last few weeks. Happy end-of-October, all, don't eat too much candy on the 31st.

Sunday, August 11, 2013

Eggs in Purgatory, Tex-Mex Style

Yesterday was one of those full and productive weekend days that I've needed recently as we prepare this month to welcome friends visiting Sydney, pack up and move house, then fly overseas for a few weeks for a very full schedule of work and play. Woke up early, got stuff done, and felt ready for the week ahead. We ended that productive day with a fantastic night out with friends in Surry Hills: pub drinks, then banquet menu Lebanese food (YUM, love those meals where you're stuffed at the end mostly due to the veg and chickpeas), and excellent Aussie red wine nightcap(s) at our friends' place... finally got home way late for this no-longer-in-her-twenties gal.
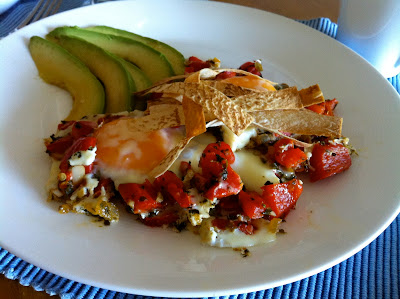
eggs sunny-side up over sautéed peppers, spinach, onion, garlic,
with avocado and crispy tortilla strips
So today is yesterday's polar opposite: pretty unproductive. I slept later than I have in ages. Breakfast needed to be lunch-ish, a healthy but filling, steadying meal. I've seen the Italian-origin dish uova in purgatorio, eggs in purgatory, on various cooking blogs and decided to throw together a Tex-Mex version, sort of huevos rancheros meets uova in purgatorio. We can't use tomatoes in our food due to allergies, so instead of the traditional tomato sauce I broiled, peeled, and chopped a couple of red bell peppers (like this). Sauteed some diced onion, garlic, and jalapeños with the chopped bell peppers and some spinach, then dropped in the eggs when the vegetables were nice and softened. Grated a little cheddar over the eggs just before they were finished, and topped everything with some crispy baked corn tortilla strips, rather than serving over crusty bread like most uova in purgatorio recipes advise.
Eggs in Purgatory, Tex-Mex Style (gluten-free) @ Southern Spoon blog
eggs in purgatory, Tex-Mex style (and gluten-free)
Pairing the eggs with sliced avocado on the plates cut the heat from the jalapeños just enough, and a side of chopped honeydew and papaya made for a perfectly balanced, fuzzy-head-curing breakfast. Whether you seek the perfect meal after a late night out, or just a hearty, vegetable-heavy brunch (or breakfast for dinner!) option, these Tex-Mex style eggs in purgatory are a good go-to. Wishing you a weekend well balanced with productivity, leisure, and quality time with friends and family.

Eggs in Purgatory, Tex-Mex Style
2 hearty servings

1 tablespoon extra virgin olive oil
half a brown onion, diced (about 1/4 cup)
2 red bell peppers, roasted, peeled and diced
3 cloves garlic, minced
2 tablespoons chopped jalapeños
1/4 cup frozen spinach, defrosted
4 eggs
2-3 tablespoons freshly grated cheddar or monterey jack cheese

to serve:
1 tortilla (gluten-free if cooking g-f), cut into long, thin strips and toasted under the oven broiler till crispy
half an avocado, sliced
hot sauce (Cholula, Tabasco) and additional jalapeño slices (optional)

Heat a large skillet over medium high heat. Add the oil and swirl to coat the pan, then add the onion. Sauté for 3-4 minutes, stirring often, until onion begins to turn translucent. Add the diced bell peppers, garlic, jalapeños, and spinach, and sauté for another 5 minutes or so, stirring occasionally. Turn the heat down to medium-low, cover, and continue to cook for another 7-8 minutes, until the bell peppers are soft.

Remove the cover from the vegetables, and crack four eggs over the vegetables, leaving about an inch between each egg and taking care not to break the yolks. Cover again, and continue to cook until the eggs are just about done-- the whites opaque and the yolks still runny. Sprinkle the grated cheese evenly over the eggs, and continue to cook for another minute or so, until the cheese is melted.

Arrange the avocado slices on the side of each plate, then serve two eggs in purgatory onto each plate, topping the eggs with the crispy tortilla strips (make sure the tortilla strips are gluten-free if cooking g-f). Serve immediately with Cholula, Tabasco, and additional jalapeño slices, if desired.

Saturday, August 3, 2013

{Lightened-up} Banana Bread with Orange Glaze

I posted my tried and true recipe for Banana Bread two years ago, a slightly adapted version from Southern Living magazine that has the most incredibly dense and moist texture due to the mixture of butter and cream cheese. Like many Southern Living recipes, it's absolutely delicious and always a hit. I regularly made loaves to give friends and family while we lived in the UK, and it was always requested if we  visited friends out of town. But it's pretty intense, and almost impossible to stop eating after just one slice. The hubs' aunt called it banana *cake*... it definitely fit that profile better than bread.
homemade banana bread, lightened up, with an orange glaze
A couple of bananas sitting in our fruit basket have been neglected for the past week and were almost completely black-- perfectly ripe for banana bread. So today I made a lighter version, using olive oil instead of butter, and substituting plain greek yogurt for the cream cheese (this makes it easier anyway for us, since sourcing cream cheese without preservatives is more difficult in Sydney). I mixed in some wholewheat with the all-purpose flour, and scaled down the sugar quite a bit. I kept the sweet orange glaze on top, as this really makes the loaf stand out from your traditional banana bread, but you could easily omit it and the bread would still taste divine.
banana bread warm from the oven
I'm very happy with this banana bread-- it still has a moist, tender crumb and a rich taste-- you don't even miss the butter, cream cheese, and extra sugar. I'll make this version from now on, save for Christmas morning or other occasions which deserve a splurge. The recipe below makes one loaf-- just double the ingredients for two, and bake in two loaf pans. Cover the bread tightly with foil and freeze for up to three months, or store in an airtight container for up to three days. If it starts to get a bit dry a few days after you've baked it, take a note from my mother and broil a slice under the broiler (aka grill) for a minute or two, caramelizing the sugars from the banana and... sugar, and making it a toasty sweet treat. Spread your toasted banana bread with coconut oil, yogurt, butter, or cream cheese to serve.

Enjoy, and happy August, all.

{Lightened-up} Banana Bread with Orange Glaze
makes one 8x4-inch loaf

1/4 cup extra virgin olive oil
1/2 cup low-fat greek yogurt (or plain yogurt)
1/2 cup raw sugar
1 egg
1/4 teaspoon vanilla extract
1 1/2 cups flour (I used 1 cup all-purpose and 1/2 cup wholewheat)
1/4 teaspoon baking soda
1/4 teaspoon baking powder
small pinch freshly ground sea salt
1/4 teaspoon ground cinnamon
heaping 1/2 cup mashed, very ripe banana (about 2 medium bananas)

Orange Glaze:
2 tablespoons sifted powdered sugar
2-3 teaspoons freshly squeezed orange juice

Preheat oven to 177C/ 350F. Grease and flour an 8x4-inch loaf pan, set aside.

In a large bowl, mix the olive oil and yogurt with a whisk or an electric mixer until well combined. Add the sugar, and mix well. Add the egg, and mix well until thoroughly combined. Stir in the vanilla.

In a separate medium bowl, mix the flour, baking soda, baking powder, salt, and cinnamon. Whisk well with a fork to evenly distribute the ingredients. Add the dry ingredients to the yogurt mixture and stir well to combine. Add the mashed banana, and stir well to combine.

Pour the batter into the loaf pan, smoothing the top of the batter. Bake at 177C/ 350F for 50 minutes to 1 hour, until the top is golden brown and a toothpick inserted into the centre comes out without any dough on it. You may need to cover the loaf with foil in the last 15 minutes or so of baking to prevent excessive browning.  Remove from oven and set aside, flipping the bread out of the loaf pan when it is cool enough to touch (you may need to run a knife around the edge of the pan to loosen the bread).

To prepare the orange glaze, mix the powdered sugar and orange juice in a small bowl until smooth. After the bread has cooled for at least 15 minutes, drizzle the glaze over the bread with a spoon, slightly spreading it around with the back of the spoon so that it evenly covers the top of the loaf.

Serve immediately, or store in an airtight container at room temperature for up to three days. To freeze, wrap tightly with foil and freeze for up to three months.

Sunday, July 21, 2013

Loaded King Ranch Chicken Casserole

King Ranch Chicken Casserole is a Texas favorite, receiving its namesake from one of the largest ranches in the world, in Kingsville, just southwest of Corpus Christi, TX. I've been to the King Ranch a few times- my family would sometimes make a stop there on the way down to visit relatives on South Padre Island. I found the ranch fascinating, and was very proud that it was so big, and in Texas. Then I met an Aussie. His country boasts THE largest ranch in the world, Anna Creek station, which makes the King Ranch look like a postage stamp. We made sure to include that fact on the back of our wedding reception menu, along with other fun Aussie-British-American statistics that our guests could peruse (amount of sweet vs. hot tea consumed, size of our respective states, etc).
King Ranch Chicken Casserole: tasty & feeds a crowd
It may not be the biggest in the world, but the King Ranch is still something of legend in Texas. Big King Ranch edition Ford trucks are branded with the running w on the side, denoting the quality leather interior. Even my grandmother owned a beautiful leather handbag, marked with the running w, which she carried proudly. This casserole reflects the legend of big, Texas tradition embodied by the King Ranch. It's filling, a little spicy, and bursting with flavor. This version has a few more vegetables thrown in than the typical recipe, and olives on top give it a little extra zing.
King Ranch Chicken Casserole loaded with extra veggies
When we lived in England, the hubs would often ask if we could make *something American* for dinner, and then usually specified this recipe. I used to make it with canned cream of chicken or mushroom soup, but this made-from-scratch version tastes better. We know exactly what goes into it, no additives or unnecessary sugar and salt. You could use your own homemade chicken or vegetable broth and your own tortillas for a true made-from-scratch recipe. This casserole can be easily made gluten-free, just use gluten-free flour to thicken the broth, and gluten-free tortillas or wraps for layering. Enjoy this classic taste of Texas, and if you haven't ever visited a ranch, I recommend stopping by the King Ranch if you're nearby.

Loaded King Ranch Chicken Casserole
6-8 servings

2 large chicken breasts (or 2 cups of shredded pre-cooked rotisserie chicken)
juice from half of a lime
1/4 teaspoon cayenne pepper
1/2 teaspoon paprika (use smoked paprika if you have it)
1/4 teaspoon freshly ground pepper
2 tablespoons olive oil (divided use)
1 large brown onion, diced
1 bell pepper, diced (any color)
3/4 cup frozen corn (or 3/4 cup cooked fresh corn)
3 cloves garlic, peeled and minced
1 tablespoon flour (for gluten-free use 2 teaspoons cornflour)
1 teaspoon ground cumin
1 cup low-sodium chicken or vegetable stock
3/4 cup chopped tomatoes (or roasted red bell peppers)
1 cup chopped fresh kale (or fresh spinach)
1 cup plain or greek yogurt (or sour cream)
4 corn or flour tortillas (gluten-free if necessary)
1 cup freshly grated cheddar cheese
1/4 cup chopped olives (optional)
2-3 teaspoons Cholula or other mild hot sauce
1 cup guacamole (optional, to serve)

[If you're using raw chicken: butterfly the chicken breasts and sprinkle the lime juice, cayenne pepper, and paprika, and black pepper evenly over the chicken breasts. Heat a tablespoon of oil in a large sauté pan over medium heat. Cook the chicken breasts in the pan for about 15 minutes or until cooked through, turning occasionally to cook evenly. Remove the chicken breasts and shred with two forks.] Set the shredded chicken aside.

Bring the same sauté pan back to medium heat and add the remaining tablespoon of oil. Add the onion and sauté for about 3-4 minutes, until it begins to turn translucent. Add the bell pepper and corn, and continue to cook over medium heat for 5-6 minutes, until the bell pepper starts to soften.

Add the garlic, flour (or cornflour), and cumin, and cook for one minute, stirring often. Add the stock, tomatoes, and kale. Continue to stir over medium-low heat for 2-3 minutes, scraping the bottom of the pan, until the mixture begins to thicken. Add the yogurt and shredded, cooked chicken, and cook for an additional 5 minutes, stirring to well to combine. Remove from heat.

In a 13x9 inch casserole dish, layer two tortillas on the bottom, then pour in half of the chicken mixture, spreading evenly over the tortillas. Layer two more tortillas on top of the chicken mixture, and sprinkle with half of the cheese. Top with remaining chicken mixture, then cheese. If desired, top with chopped olives and a few dashes of Cholula.

Bake at 350F / 177C for 30 minutes, uncovered, until bubbling. Serve warm, with guacamole on the side if desired.

Storage tip: Casserole will keep, covered in the fridge, for 2-3 days.

Friday, July 12, 2013

{vegan} Molasses Cookies

Molasses cookies always make me feel like Christmas. Much like the chilly nights we're experiencing in Sydney at the moment. The first year I lived in Australia, I realized one day in the middle of July that I was humming Christmas music in my head. It startled me to think how closely my subconscious related cold weather with my favorite holiday season. I had experienced plenty of cold, non-Christmas weather living in England, but somehow mid-July in Sydney got me into the yuletide spirit.

My mother makes molasses cookies and apricot preserves to give away every Christmas. All through the fall months, the freezer would gradually fill with tins of frozen cookies, and jars of apricot preserves would take up copious amounts of room on the fridge shelves. My siblings and I would sneak into the freezer and pull cookies from various tins, carefully rearranging my mother's perfectly placed cookies so that the recipient wouldn't realize they hadn't received a full batch (mom could always tell we'd stolen a couple). To this day, they're one of the only desserts besides ice cream that I will eat frozen.
{vegan} molasses cookies @ Southern Spoon blog
spiced molasses cookies: vegan & delightful
This is a lightened up and vegan version of my mother's recipe, which I think originated in an Atlanta Junior League cookbook. It's a small batch, so double it up if you're baking for a crowd. I've used oil instead of Crisco vegetable shortening because it allows you to cut the fat in half, and because Crisco is hard to come by in Australia (and I've learned through expat experience that if you aren't going to use Crisco as your shortening, don't bother trying anything else). Instead of an egg, this recipe features ground flaxseed mixed with water. I've also cut the sugar in half, and incorporated some whole wheat flour, which holds up well in this bold-flavored cookie. If you don't like cloves, use a little less than a 1/2 teaspoon, but don't cut them out completely. The spice mixture really is key, but make sure it's well blended into the flour before you mix the dry ingredients into the wet ingredients.
{vegan} molasses cookies @ Southern Spoon blog
warm molasses cookies with not-so-vegan vanilla ice cream
These are delicious served on their own or tucked into a scoop of vanilla ice cream (the hubs' pick). They make a great holiday gift, and they travel well. My best friend's little brother decided these were his favorite cookie many years ago when my mother began gifting them for Christmas. When he served in Afghanistan, his mother got the recipe from mine and sent out regular deliveries of molasses cookies. What a comfort it can be to experience tastes and smells that immediately recall memories of family, home, and the many things in life worth fighting for. I hope you enjoy this recipe, and that you treasure old family food traditions even as you create your own.

{vegan} Molasses Cookies
12 cookies

1/4 cup plus 1 tablespoon oil (I use rice bran oil or olive oil)
2 tablespoons molasses
1/4 cup plus 2 tablespoons raw sugar (divided use)
1 tablespoon ground flaxseed reconstituted with 2 tablespoons warm water
1 cup flour (I use half all-purpose or spelt flour and half whole wheat flour)
1 1/2 teaspoons baking soda
1/2 teaspoon ground cinnamon
1/2 teaspoon ground cloves
1/2 teaspoon ground ginger
pinch of freshly ground sea salt

In a large bowl, mix the oil, molasses, and 1/4 cup raw sugar until well blended. Add the flaxseed which has been reconstituted by the water, and mix until well blended. 

In a medium sized bowl, combine the flour, baking soda, spices, and salt. Mix thoroughly until combined. 

Pour the flour mixture into the molasses mixture, and stir well until combined. Chill dough in the fridge for at least 40 minutes, or up to 12 hours.

Roll the dough into balls of about 1-inch diameter. Roll each dough portion in the remaining 2 tablespoons of raw sugar, coating evenly. Place on cookie sheets, leaving at least 3 inches between each dough portion. Bake at 277C/ 350F for 8-10 minutes, until cookies have spread out to about 2 inches in diameter and are crackled on top. 

Remove from oven and wait for one minute before removing cookies. Allow the cookies to firm up a bit by cooling for at least 5 minutes before serving. 

Can be stored in an airtight container for up to a week, or frozen for 3 months.

Friday, June 21, 2013

Savory Butternut Parmesan Muffins

I made up another small batch of savory muffins to go with our dinner one night this week. These butternut muffins with herbs and a little parmesan and cheddar were a wonderfully flavored side and matched well with our rosemary and garlic pan-fried lamb steaks, roasted cauliflower, and roasted brussels sprouts with garlic and walnuts. I had leftover roasted butternut squash from a couple of nights ago, which made these very easy to throw together,  just stuck them into the oven in the last 20 minutes of roasting the cauliflower and brussels sprouts.  

savory butternut parmesan muffins {made with whole grains} @ Southern Spoon blog
savory muffins full of roasted butternut squash, herbs,
 a little parmesan & cheddar cheese
Like the savory pepper cheddar oat muffins I posted last week, these butternut beauties are a fairly quick way to get a little homemade something on the table, even on busy nights. I remember coming home from school after late practices, starving, and realizing that mom had a batch of savory muffins in the oven to go with dinner. The smell of homemade bread of any sort baking in the oven is amazing, but I always liked muffins best.
savory butternut parmesan muffins {made with whole grains} @ Southern Spoon blog
packed with flavorful vegetables & topped with cheese = ideal savory muffin 
You could doctor these to suit whatever you have on hand, some chopped feta instead of cheddar and parmesan would be good, and rough chopped spinach stirred through would add some nice color. A little chopped bacon or prosciutto would also be amazing here--slightly sweet pumpkin always pairs well with salty cured meat. We can usually find prosciutto cured only with salt (no preservatives) in most grocery stores and delis-- try to use this instead of anything cured with sodium nitrate or sodium nitrite. The combination of half wholewheat and half wholegrain spelt flours worked beautifully, but feel free to experiment with your favorite flours.

There are only a couple of muffins in these photos because we ate the rest before I had a chance to pull out the camera... hope you get a chance to whip some up soon, then watch them disappear just as quickly as you made them!

Savory Butternut Parmesan Muffins
makes 6 muffins (double recipe for 12 muffins)

1/3 cup mashed, cooked butternut squash (or other pumpkin)
1/2 cup milk
1 egg
2 tablespoons oil (I used extra virgin olive oil)
1 tablespoon finely grated parmesan cheese
3 tablespoons finely grated cheddar (divided use)
1 cup flour (I used half whole wheat and half wholegrain spelt flour)
1/2 teaspoon baking powder
1/2 teaspoon baking soda
pinch of freshly ground sea salt
pinch of freshly ground pepper
1/4 teaspoon dried parsley
1/4 teaspoon dried oregano

Preheat oven to 190C / 375F. Prepare a muffin tray (use paper liners sprayed with a little oil, or generously oil and flour the muffin cups directly).

In a large bowl, whisk together the mashed butternut, milk, egg, and oil. Add the parmesan and 2 tablespoons of the cheddar cheese, whisk well. Scatter the dry ingredients evenly over the butternut mixture. Mix just until combined (avoid overmixing to ensure a soft crumb).

Spoon the batter into the muffin tray, distributing evenly amongst 6 muffin cups. Sprinkle the top of the muffins with the remaining tablespoon of cheddar cheese. Bake at 190C / 375F for 18-20 minutes, until a toothpick inserted into the centre comes out clean and the tops are beginning to turn golden brown. Serve warm. 

Will keep in an airtight container for up to 2 days.

Monday, June 17, 2013

Fisherman's Pie topped with Crispy Capers

I had never had fisherman's pie before living in England, but it soon became a go-to item whenever I saw it on a pub menu. The flavorful base of seafood, onions, and cream, topped with piping hot mashed potatoes, was an ideal dish for warding off chilly fall and winter nights. The hubs and I began making it from scratch, sometimes using a sweet potato topping to change things up. Since our move down under we've fallen out of the habit of cooking some of the cold-weather dishes we used to rely on so often. The chill is in the air, however, on these Sydney winter evenings, and I find myself cooking up casseroles and roasts like we used to in our tiny London flat.
Fisherman's Pie topped with Crispy Capers @ SouthernSpoon blog
fisherman's pie hot out of the oven: fish and prawns in a fragrant white sauce
with leeks and onions, topped with mashed potatoes and salty capers
So fisherman's pie is back on the menu, until it begins to warm up again in a few months. I was delighted to discover that Katie Quinn Davies includes a recipe in her What Katie Ate cookbook, and have used it as my inspiration the past few times I've baked up a fisherman's pie. She tops the mashed potatoes with crispy, pan-fried capers: genius! We love capers, and the hubs finds any excuse to add them to whatever we're making. Though I've simplified Katie's method by sprinkling the capers straight from the bottle onto the top of the pie, rather than frying them up first, the taste really sets this recipe apart from your tried-and-true fisherman's pie. 
Fisherman's Pie topped with Crispy Capers @ SouthernSpoon blog
Fisherman's pie, adapted from the wonderful What Katie Ate cookbook
The celery, onion, leek, and green onion layer on the bottom is glorious; don't leave out the leeks. We use whatever combination of fish we feel like: a few fillets of firm, white fish, a couple handfuls of prawns, or a seafood medley of baby octopus, prawns, calamari, scallops, etc from our fishmonger. I also use milk rather than cream in the pie filling, just to slim things down a bit, though cream in place of half of the milk called for would make a beautifully decadent pie. Be careful when poaching the fish in the milk and cook over very low heat, stirring often, as milk can burn very easily on a thin-bottom pot over the stove (you'd think I would learn the first time...). If you're feeling adventurous, try sweet potatoes on top!
fisherman's pie, perfect dinner for a cold night
If you've never made fisherman's pie, I highly recommend this recipe for a cold night's dinner. Bookmark it away if it's too hot in your region at the moment to contemplate cooking a savory pie for dinner. I've often thought this would be a nice and casual winter dinner party dish if cooked in individual mini-casseroles. The pie also keeps well for a day, and the leftovers are even more flavorful. Enjoy.

Fisherman's Pie topped with Crispy Capers
5 hearty servings
adapted from the What Katie Ate cookbook

5-6 medium potatoes, scrubbed and peeled
3 fillets firm, white fish (such as Basa)
1 1/2 cups raw prawns (shrimp), peeled and deveined, tails removed
3 cups milk (divided use; any fat content will do)
freshly ground sea salt
freshly ground pepper
1 tablespoon cornflour (cornstarch)
1 tablespoon extra virgin olive oil
2 long sticks celery, sliced into 1/4-inch pieces (about 1/2 cup)
1 medium onion, peeled and roughly chopped
1 large leek, thinly sliced (white and light green parts only)
4 green onions, thinly sliced (white and green parts)
3 cloves garlic, minced
1 tablespoon dijon mustard
1 teaspoon dried parsley flakes
1 teaspoon dried oregano
1/2 teaspoon dried basil
1 tablespoon capers

Preheat oven to 200C / 400 F, and lightly grease a (4 qt) casserole dish with oil. Set casserole dish aside.

Chop the potatoes into large pieces and place in a large pot of water. Bring the potatoes to the boil over high heat, then turn down to medium and simmer until a blunt knife cuts through the potato easily, about 10-12 minutes. Drain potatoes, return to pot, and mash with a fork or potato masher. Add a pinch of freshly ground pepper, a dash of freshly ground sea salt, and gradually drizzle in 1/4 - 1/2 cup of milk, whipping to combine and adding additional milk only as necessary, until thick and creamy. Set the mashed potatoes aside to use as your pie topping.

Meanwhile, in a medium pot over low heat, poach the fish in 2 1/2 cups of milk with a pinch of freshly ground pepper and a small pinch of freshly ground sea salt. Watch careful and stir often to make sure the milk does not burn on the bottom of the pot. Cook until fish is done and flakes easily with a fork (about 8-10 mins, this will vary depending on the thickness of your fish fillets). In the last couple of minutes that the fish is cooking, add the raw prawns, and cook until they turn pink. Remove the cooked fish and prawns from the pot to a chopping board, and reserve the milk for the white sauce filling. Roughly chop the cooked fish and prawns. Set aside. 

Make the sauce: Return the pot of reserved milk that was used to cook the fish to low heat. Whisk in the tablespoon of cornflour, whisking constantly for a minute until it is completely dissolved. Add the mustard, parsley, oregano, and basil. Cook for a further 3-4 minutes on low to let the herbs flavor the sauce. This white sauce will thicken up a little bit, but will remain fairly thin. Remove from heat and set aside.

Heat the tablespoon of olive oil in a sauté pan over medium heat. Add the onion, celery, and leeks and sauté for about 5-6 minutes, until leeks begin to soften and break apart easily. Add the green onions, and saute for a further 4-5 minutes, stirring often. Add the garlic, and sauté for another 2 minutes, stirring often to ensure the garlic doesn't burn. Remove from heat. Scrape the leek-onion mixture into the bottom of the prepared casserole dish, spreading the mixture evenly over the bottom.

Top the leek-onion mixture with the chopped fish and prawns, then pour the white sauce evenly over the fish. Spoon the mashed potatoes over the top, roughing up the surface a bit so that it's not a smooth layer. Place casserole in pre-heated oven and bake at 200C / 400F for 40 minutes.

After 40 minutes, remove casserole from oven and sprinkle with 1 tablespoon capers. Return to oven and continue to bake at 200C / 400F for another 10-15 minutes, until the edges are bubbly and the mashed potatoes are beginning to turn a bit golden brown in places. Serve immediately.

Will keep in the fridge for up to one day.  

Saturday, June 15, 2013

Savory Pepper Cheddar Oat Muffins

This week has been full of busy nights, working a bit later than usual to stay on top of everything. It's weeks like this when what we eat for dinner matters most, fueling us through and keeping us healthy. But sometimes there just doesn't seem to be enough time or energy left in the day to prepare an entire dinner from scratch. As I mention often on this blog, we have allergies to preservatives and artificial food additives, so most processed foods aren't an option for us. This is a great thing! And it forces us to rely on whole/real food, but it can make shortcut meals more challenging.

There are a couple of local, Australian organic soups on grocery store shelves that I've been buying a bit more often lately to have on hand for busy nights. The soup flavors are creative, with generous portions of vegetables, and they're filling enough to leave us both satisfied. One night this week I grabbed a couple of these soups and decided to make a bit of an effort with homemade muffins to serve alongside. It took very little time to throw the ingredients together and put them in the oven as soon as we got home from work. By the time we'd washed the mixing bowl, set the table, and warmed up the soups, the muffins were ready to eat, and made our shortcut soup dinner taste homemade.

Pepper & Cheddar Oat Muffins @ SouthernSpoon blog
small batch savory muffins with oats, pepper, herbs, and cheddar

The hubs is looking over my shoulder as I write this post and insists that *mustard is the main drawcard* for these muffins, and that I should call them Mustard Cheese Muffins. Such a man. This guy eats mustard from a spoon. I kindly overruled and insisted back that Mustard Cheese Muffins is perhaps not the most attractive recipe title. But he does have a point-- the little bit of mustard in these savory muffins, along with the mix of freshly ground pepper, herbs, and shredded cheese, really does make them stand out. Oats are always a winner at our house (heart healthy!), and I loved the soft but hearty texture of part spelt / part wholewheat flour.

Savory Pepper Cheddar Oat Muffins @ SouthernSpoon Blog
savory pepper and cheddar oat muffins with a tiny hint of mustard: delicious dinner accompaniment

I've only baked these in a small batch (six muffins), but I'm sure doubling the ingredients will work fine to bake a full dozen. They're best eaten warm, so serve straight out of the oven, or reheat in the microwave for a few seconds. Whip up a tray of these savory, cheese-topped muffins for your next weeknight dinner, and enjoy fresh-from-the-oven, homemade taste even on your busiest days!

Savory Pepper Cheddar Oat Muffins 
makes 6 muffins (double recipe for 12 muffins)

1/2 cup plus 1 tablespoon rolled oats (not instant)
3/4 cups milk (any fat content will do)
1 - 2 teaspoons prepared mustard (to taste)
1 egg white, slightly beaten
2 tablespoons extra virgin olive oil
3/4 cups flour (I used 1/2 cup spelt flour & 1/4 cup wholewheat flour)
1/2 teaspoon baking powder
1/2 teaspoon dried parsley
1/2 teaspoon dried oregano
1/4 teaspoon dried basil
1/2 teaspoon freshly ground sea salt
1/2 - 1 teaspoon freshly ground pepper (to taste)
1/4 cup plus one tablespoon shredded cheddar cheese

Prepare 6 cups in a muffin tin (use paper liners or lightly grease and flour) and preheat oven to 190C / 375F.

In a small bowl, combine 1 tablespoon oats and 1 tablespoon shredded cheese. This will be your muffin topping: set aside.

In a large bowl, combine 1/2 cup oats and the milk. Add egg white and olive oil, and mix well. Add remaining ingredients (flour through 1/4 cup shredded cheese), and stir until just combined.

Distribute the batter evenly amongst the 6 prepared muffin cups. Sprinkle the top of each muffin with the oat-cheese mixture. Bake at 190C / 375F for 18-20 mins, until muffins begin to turn golden brown around the edges and a toothpick inserted into the centre comes out with only a few crumbs. Serve warm.

Saturday, June 8, 2013

Simple Crepes + Breakfast Crepes with Mushrooms, Spinach, & Eggs

It's a long weekend here in Sydney, with Monday off for the Queen's birthday. (Not QE II's real birthday, mind you, but her commemorated birthday date in Australia... except for Western Australia. Commonwealth holidays can be confusing!) So we're enjoying a beautiful, crisp, sunny 3 days' break. Planning to walk down to the beach this afternoon, then maybe head into the city tomorrow to read all day and sip coffee at a café.

To kick off the weekend yesterday morning, the hubs suggested trying out a new crepe place that just opened around the corner from us. When we lived in London's beautiful village of Hampstead, just a few stops up from the city centre on the Northern Line, we used to indulge a little too often in the famous creperie stand on Hampstead's high street. Some weekends, the line (queue) would be a block and a half long, everyone waiting patiently while the two French cooks inside the tiny metal stand churned out savory and sweet crepes. They were folded into big triangles and given to patrons to-go in triangle-shaped cardboard wrappers with a fork and napkins, and cost only a few pounds each. While they poured batter and skimmed the flat wooden paddles across the crepes to make them huge, thin, and crispy, the cooks chatted back and forth in French, reaching across each other to grab cans of ratatouille, heaping spoonfuls of sautéed spinach and fresh shredded cheese, or big spoonfuls of Nutella. Every time we ate a crepe, standing in the little laneway just behind the cart, that little corner of Hampstead felt like our own authentic mini-break to Paris.
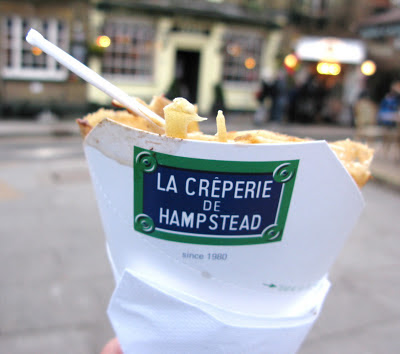
Hampstead Creperie @ SouthernSpoon Blog, via GourmetTraveller88
I hope they serve crepes in heaven. Beautiful pic of the
Hampstead Creperie in London from Gourmet Traveller 88.
We haven't had a crepe since we moved to Sydney's north shore from Hamsptead almost two years ago, so this new creperie around the corner looked enticing. But when I had a glance at their (small) menu, I was taken aback by the prices. For one crepe! Sydney is notoriously expensive (ranked as the 3rd most expensive city in the world this year by The Economist Intelligence Unit), but this was just silly. I suggested instead that we make crepes at home-- how hard can it be? One of my college roommates used to make them all the time, without any of that fancy equipment: the big, flat, crepe griddle, the long wooden paddle to smooth out the batter. So we did. And they were easy, incredibly delicious, and we got a whole half dozen of them for a fraction of the cost of just one at the recently-opened creperie.

Breakfast Crepes with Mushrooms, Spinach, and Eggs @ Southern Spoon Blog
Delicious breakfast crepes with mushrooms, spinach, garlic, cheese, and an egg. 
This is an easy, fool-proof crepe recipe that can be used for savory or sweet fillings, serving as a main course for breakfast, lunch, or dinner. Your imagination is the limit for turning a stack of crepes into a creative meal or gorgeous dessert. Keep a few in the freezer and warm them up in the microwave for a quick start to a meal or a tasty snack. Below the simple crepe recipe, I've given the method we used to make some spectacular breakfast crepes, full of sautéed mushrooms, garlic, spinach, topped with melted cheese and a fried egg. These were filling and truly delicious, and could easily serve as a main course any time of day.
Breakfast Crepes with Mushrooms, Spinach, and Eggs @ Southern Spoon Blog
Crepes in the morning: breakfast bliss
My next crepe mission: to make the mouth-watering crepe cake from the Smitten Kitchen Cookbook. Be fearless and try your hand at crepes!

Simple Crepe recipe @ Southern Spoon Blog
Simple crepes. Super easy, and ready to serve as a base for creative breakfasts, dinners, or desserts.

Simple Crepes
makes 6 crepes
adapted from Cooking Light

1 egg
1 cup milk (I used skim, any fat content will do)
2/3 cup flour (I used 1/3 cup whole wheat and 1/3 cup wholegrain spelt flour)
2 tablespoons ground flaxseed (or buckwheat, wholegrain wheat, or wholegrain spelt flour)
pinch of freshly ground sea salt
oil for coating pan to cook crepes (I used extra virgin olive oil)

In a medium bowl, whisk together the egg and milk until combined. Add the flour, flaxseed, and salt, whisking to combine. Cover with a tea towel and set aside for 15-30 minutes while you prepare your fillings.

To cook the crepes, heat a wide sauté pan over medium heat. Coat with a thin film of oil. When the pan is hot, pour a scant 1/4 cup of crepe batter into the centre of the pan, lifting and tilting it in a circular motion so that the batter spreads out into a wide circle. Set the pan back on the stove top and cook for about 1-2 minutes, until the crepe can be easily moved around the pan with a spatula and is golden brown on the bottom. Flip the crepe over and continue to cook for another 30 seconds to one minute, until golden on both sides.

Set the cooked crepe on a plate and cover with a paper towel, square of parchment/baking paper, or wax paper, and repeat with remaining batter. Make sure to layer the cooked crepes with a paper towel or similar so that they don't stick together as they cool. To keep them warm as you're cooking the entire batch, place the cooked crepes in a pre-heated 100C/215F oven. Serve warm with your choice of filling. (See Breakfast Crepe recipe suggestion below). Or just go with Nutella, always a winner.

* Storage Tip: Store cooked crepes, layered with paper towels or parchment paper or wax paper, in a freezer-proof bag in the freezer. To use, reheat crepes in the microwave until warm.

Breakfast Crepes with Mushrooms, Spinach, and Eggs
Serves 2 (multiply ingredients as required)

2 cooked crepes
extra virgin olive oil for the pan
1 cup sliced mushrooms
2 cloves garlic, minced
2 cups baby spinach leaves
pinch of freshly ground sea salt
pinch of freshly ground pepper
1/3 cup shredded cheddar cheese
2 eggs

Heat a thin film of extra virgin olive oil in a sauté pan over medium heat. When hot, add the sliced mushrooms. Cook mushrooms, stirring occasionally, for about 5 minutes, until they begin to turn golden around the edges. Turn the heat down to medium-low and add the minced garlic. Cook for about 2 minutes, stirring often. Add the spinach, salt, and pepper, and cook for about 3-4 minutes, until spinach is wilted. Remove from heat.

Turn the oven broiler (grill) onto medium-high. Lay the two crepes on a large baking sheet. Distribute the mushroom/spinach mixture over the crepes, and top each crepe with the shredded cheese. (Save the sauté pan for the eggs). Place the baking tray in the oven about 5 inches from the heat source at the top of the oven, and crack the door open an inch or two.

While the crepes are in the oven with the cheese melting, make two fried eggs. Return the sauté pan to medium heat, add a thin film of oil, and cook the eggs sunny-side up: until whites are opaque but the yolks are still runny. Keep an eye on the crepes in the oven to make sure they don't burn. (If the crepes are done before the eggs, turn the broiler off and move the baking tray to the middle of the oven so that the crepes stay warm).

To serve, place each crepe on a plate and top with a fried egg. Serve open-faced, or fold the crepe in half to keep the filling warm. Serve immediately.

Saturday, June 1, 2013

Baked Potatoes with Carne Asada + Recipes for Guacamole and Pico de Gallo

Last weekend I stumbled across a recipe on the Homesick Texan for baked potatoes stuffed with carne asada and topped with melted cheese, sour cream, guacamole, and pico de gallo. The hubs saw it on my computer screen and we both agreed to recreate it asap. The Homesick Texan explained that this was her interpretation of a Mexi-Cali dish where carne asada and all the toppings are served over a pile of french fries. I look forward to sampling that version in California in the hopefully not too distant future. But in the meantime, carne asada over baked potatoes was a genius winter meal for our Sunday dinner.
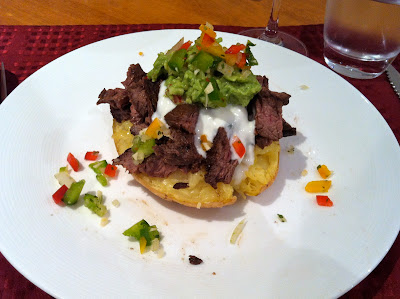
Baked Potatoes stuffed with Carne Asada @ SouthernSpoonBlog
homemade pico de gallo and guacamole top carne asada stuffed baked potatoes
This marinated meat is incredible-- tastes just like *real* carne asada in a restaurant! We used just over a kilo of skirt steak (about 2.5 lbs). This made plenty for three big dinner servings of carne asada over baked potatoes, with enough meat leftover to go into some hearty kale and roasted bell pepper quesadillas the next night (so 2.5 lbs of steak would probably serve 5 people if you're just making the stuffed baked potatoes). I found half of a baked potato generous enough for me, the hubs used a whole baked potato for his portion.

I made a pico de gallo (sans tomatoes due to allergies, used finely diced red bell peppers instead), and we served our carne asada-stuffed baked potatoes with a little shredded cheddar cheese, greek yogurt, homemade guacamole, pico de gallo, and hot sauce on top. They were delicious, filling, and totally worth throwing the meat marinade together in the morning so that the skirt steaks could soak up the flavor all day.

Baked Potatoes stuffed with Carne Asada @ SouthernSpoonBlog
baked potatoes stuffed with delicious marinated skirt steak (carne asada)
Rather than sear the meat then broil it in the oven as the Homesick Texan suggests, we simply cooked the steaks on a hot griddle on the stovetop. This took a bit longer (5-6 mins per side), but cooking time will depend on the thickness of your steaks and your preference for doneness. As suggested, let the steaks rest for a good 10-15 minutes (we just set ours on a plate and covered them with a large bowl), as this really makes a difference in the tenderness of the meat.
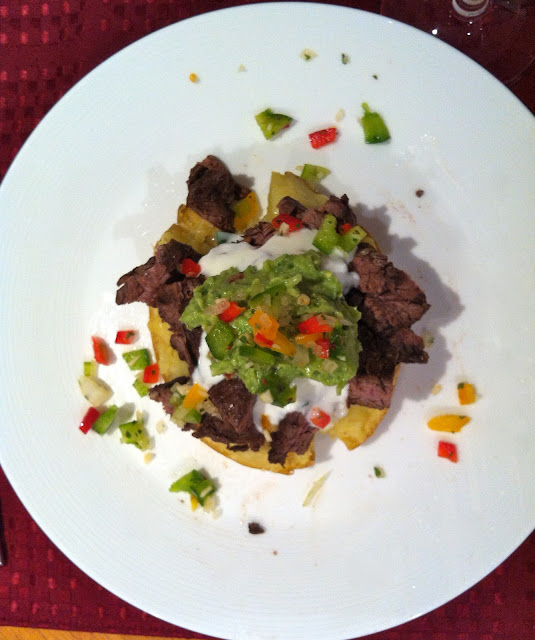
Highly recommend this recipe for baked potatoes with carne asada, which you can find here at the Homesick Texan. Below I include simple recipes for a homemade guacamole and a tomato-free pico de gallo. Perfect toppings for this recipe and many more Tex-Mexi-Cali dishes.

Guacamole
yields about 1 cup

1 large, ripe avocado
1-2 tablespoons finely diced purple onion (to taste)
2 tablespoons finely diced bell pepper (any color, red is pretty)
2-4 teaspoons fresh lime juice (to taste)
pinch of freshly ground sea salt
pinch of freshly ground pepper
1-2 teaspoons mild hot sauce (such as Cholula), optional
1-2 teaspoons water

In a non-reactive bowl, mash the avocado meat with a fork until fairly smooth. Add remaining ingredients, adjusting onion, lime juice, salt* and pepper, and (if desired) hot sauce to taste. Stir to combine. If you prefer a smoother guacamole, add 1-2 teaspoons water and mix well.

Serve immediately, or store in the fridge for up to 24 hours (the lime juice will prevent it from turning brown).

* If you'll be serving the guacamole with salted tortilla chips, taste the guacamole with a chip before adding additional salt so as not to over-salt.

Pico de Gallo (without tomatoes)
yields about 1 1/4 cups

1/2 cup finely chopped red bell pepper (sub chopped tomatoes if desired
1/2 cup finely chopped green bell pepper
1/4 cup finely chopped purple onion
2 teaspoons finely chopped hot chili pepper (such as jalapeño or birds eye chili pepper)
1 clove garlic, minced
1 teaspoon apple cider vinegar (or fresh lime juice)
pinch of freshly ground pepper
2 tablespoons chopped fresh parsley (or 2 teaspoons dried parsley)

Combine all ingredients in a non-reactive bowl (glass rather than metal).

Serve immediately, or store in the fridge for up to 2 days.