Saturday, November 5, 2011

'Basic to Brilliant Y'all', a cookbook by Virginia Willis

Scrolling through my favorite food blogs this afternoon (while enjoying the leftover coffee cake muffins from this morning!) I came across a new cookbook that was shot by Tartelette.  Chef Virginia Willis's Basic to Brilliant Y'all: 150 Refined Southern Recipes and Ways to Dress Them Up for Company looks incredible.

I love cooking homestyle Southern food for my guests, and I'm always looking for ways to make the presentation more elegant and the taste more sophisticated.  Shrimp and grits with a basket of cornbread muffins is delicious fare, but sometimes you just want to elevate the meal.  As we know, my silver spoons are still in Texas... so if the placesetting isn't going to provide the extra panache, the food needs to rise to the occasion.

I'm going to peruse this new cookbook and try out some of the recipes this month.  Will let you know how it goes!

Coffee Cake Muffins with Pecan-Oatmeal Streusel

First post from the new kitchen! Still waiting on all my baking gear to arrive (two weeks to go!), but we've made do pretty well with the bare minimum. For the past week we've had Texan friends of friends staying with us: our first houseguests in our new home! We've had a great time getting to know them and showing them the sites (and tastes) of this beautiful city.


This morning we cooked up a big breakfast, including these coffee cake muffins. I saw a recipe on Cooking Light for a coffee cake that grabbed my attention because it included toasted oats-- what a great concept! I adapted the recipe for muffins, reduced the sugar and cholesterol, amped up the cinnamon, and subbed pecans for walnuts. The result is a light and deliciously spiced muffin that perfectly evokes Texas weekend brunches.
Southern Spoon blog: coffee cake muffins with pecan-oatmeal streusel
coffee cake muffins hot out of the oven
I used self-raising all-purpose and whole-wheat flours because that's what I had on hand. If you have plain flours just add 1 teaspoon of baking powder and 1/2 teaspoon of baking soda to the dry ingredients. For a large cake instead of muffins, just bake the batter in a greased 9-inch round springform pan. Enjoy!
Southern Spoon blog: coffee cake muffins with pecan-oatmeal streusel
oatmeal, cinnamon, brown sugar, and pecan goodness


Coffee Cake Muffins with Pecan-Oatmeal Streusel
Makes eleven muffins or one 9-inch round cake


3/4 cups old-fashioned rolled oats, divided
1 cup self-raising all-purpose flour
1/4 cup self-raising whole-wheat flour
(if you don't have self-raising flours, add 1 tsp baking powder and 1/2 tsp baking soda)
pinch of salt
1/3 cup granulated sugar
1/3 cup packed brown sugar, divided
1/3 cup vegetable oil (rice bran oil works well, and is good for you)
2 large eggs
1/2 teaspoon vanilla extract
1 cup low-fat natural yogurt
1/4 cup coarsely chopped pecan
1 teaspoon cinnamon, divided
1 tablespoon chilled butter


Preheat oven to 350F/ 175C. Spray a 12-cup muffin tray or a 9-inch round springform pan with cooking spray.


Spread the chopped pecans on a baking sheet and bake at 350F/ 175C for 7-8 minutes, until fragrant and browning. Remove and set the pecans in a small bowl.


Spread out the oats on a baking sheet and bake at 350F/ 175C for 7-8 minutes. Reserve 1/4 cup of the toasted oats. Pour the rest of the oats into a large bowl and add the other flours (plus baking soda and powder if not using self-rising flours), salt, and 1/2 teaspoon of the cinnamon; mix well.


In another large mixing bowl, beat together the granulated sugar, half of the brown sugar (about 2 tablespoons), and the vegetable oil. Add the eggs one at a time, mixing well after each addition. Mix in the vanilla.


Add the flour mixture to the sugar mixture alternately with the yogurt, beginning and ending with flour. Stir only a few times with each addition, some lumps will remain-- do not overmix! Spoon the batter evenly into 11 of the greased muffin cups (you will get a nice, big, rounded muffin by distributing into only 11 of the 12 muffin cups).


Add the reserved 1/4 cup of toasted oats, the rest of the brown sugar (about 2 tablespoons), and the remaining 1/2 teaspoon of cinnamon to the reserved toasted pecans. Mix with a fork. Add the tablespoon of butter rub the mixture with your fingers until the butter is evenly distributed.


Sprinkle a big spoonful of the pecan-oatmeal streusel on top of each portion of muffin batter (or sprinkle evenly over the entire cake pan if using a 9-inch round springform pan), patting down lightly with your fingers to anchor the nuts into the batter.


Bake the muffins at 350F/ 175C for 18-20 minutes (or bake for 38-40 minutes if baking in a 9-inch round pan), until risen and a toothpick inserted into the middle comes out clean.


Cool for at least 6 minutes so that the muffins slide easily out of the pan when you run a knife around the edges. Or, if baking as a large cake, cool for at least 10 minutes, then remove the sides of the springform pan. Serve immediately. These muffins store well in an airtight container for 2-3 days.

Wednesday, October 5, 2011

Absence Makes the Heart Grow Fonder

I've been away from the blog for almost a month now; how time flies!  Since the last post I have packed up and moved from England to Australia, found a place to live, and started a new job.  All going well, but it's taken a while to set up in a new country.  I finally got a fridge, and next week I'll have internet at home: two essential elements for writing a food blog!

Most of my cooking items (and the rest of our 'personal effects') are on a boat floating this way as I type.  I'd like to think they're rounding the Cape of Good Hope right about now.  They should arrive sometime in November.  Till then, I've got a few things that I've picked up here over the last couple of weeks, plus the items I packed in my suitcase (US measuring spoons/cups, a covered pyrex dish, a non-stick cookie sheet, a red silicon spatula, three sizes of biscuit cutters, a wine key, and a lovely cheese knife-- kind of funny what I considered 'essential' at the time I was packing).  

The food here is wonderful.  They have a way of beautifully preparing things so that the simple goodness of fresh ingredients shines through.  I've had the best coffee I've ever tasted (including Italy), the platonic form of a chicken sandwich, and conversation-stopping yum cha (dim sum).  I can't wait to share the inspiration of these culinary finds.  We're also coming into spring, and summer is just around the corner. The hearty soups and hot meals that, for me, have always signaled October-February are going to be swapped for lighter fare as I negotiate the upturned seasons.  

So lots to come, but thanks for your patience as I get settled into this new country and a new kitchen!

Wednesday, August 10, 2011

Rice Pudding Cake with Apricots

When I saw a recipe for Gateau de Riz on Tartelette, I knew I had to try it.  The homely rice pudding cake looked delicious, and I knew my husband, who loves rice pudding, would enjoy it.  I didn't have short-grain rice on hand so I just used long-grain white rice, and it turned out very well.
Southern Spoon blog: rice pudding cake with apricots
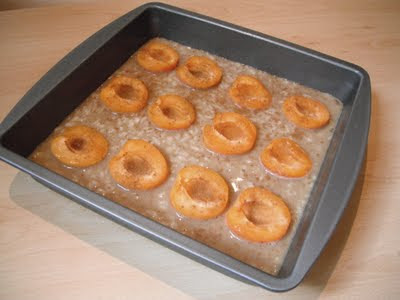
Rice pudding cake about to go into the oven to bake
(and my kitchen smells like cinnamon and vanilla heaven). 
Figs were used in the original recipe, and plums would also be an excellent fruit substitute.  I used apricots, since they are overflowing on the shelves right now in my local store.  I halved the recipe and cut down on the fat by replacing the coconut milk with 2% milk, and I topped it all with a sprinkle of cinnamon for a fragrant finish.

Southern Spoon blog: rice pudding cake with apricots
Baked rice pudding cake with apricots, vanilla, and cinnamon, topped with powdered sugar.

We thought this was very tasty, and it was even better reheated in the oven the next day.  Just wrap the entire cake in foil and seal the edges to store in the fridge.  To reheat, place the foil-wrapped cake in a preheated 300F/ 150C oven and heat for about 10-15 minutes.  A comfort food dessert, this is not something that I would serve at a dinner party, but it's a perfect end to a home cooked meal.
Southern Spoon blog: rice pudding cake with apricots
Rice pudding cake with apricots: tasty comfort food dessert!

Rice Pudding Cake with Apricots
adapted from Tartlette
6 generous servings

1/2 cup white rice
1/2 cup water
1 cup milk (divided)
pinch of salt
1 1/2 teaspoons vanilla (divided
4 tablespoons dark brown sugar, packed
3 eggs, gently beaten
1 1/2 teaspoons cinnamon (divided)
6 apricots, cut in half with stones removed
1 tablespoon sugar (demura or trbinado sugar if you have it)
1 tablespoon powdered sugar to serve (optional)

Preheat the oven to 350F/ 175C, and lightly grease a 9x9 inch baking pan.

Bring the rice, water, 1/2 cup of of milk, pinch of salt, and 1 teaspoon of the vanilla to a boil over medium-high heat.  Turn the heat down to medium and simmer, covered, for about 20 minutes, until all of the liquid is absorbed.  Test to see if the rice is tender.  If not, add a 1/4 cup more of hot water and continue to simmer for another 5-10 minutes.  Remove from heat and allow to cool slightly.

Add the remaining 1/2 cup of milk, brown sugar, eggs, 1 teaspoon of cinnamon, and 1/2 teaspoon of vanilla to the rice, stirring well until incorporated.  Pour the rice mixture into the prepared baking pan.

Arrange the apricot halves evenly over the rice, split side up.  The pudding will rise slightly during baking to encase the apricots, so don't worry if they seem to stick up out of the mixture before baking.  Combine the remaining 1/2 teaspoon cinnamon with 1 tablespoon of sugar (preferably demura or turbinado sugar), and sprinkle evenly over the rice and apricots. 

Bake at 350F/ 175C for 20-25 minutes, until the top is beginning to brown.  Remove from oven and allow to cool for about 10 minutes, then sprinkle with a tablespoon of powdered sugar through a sifter.  Serve warm.

Wednesday, August 3, 2011

Perfect Banana Bread with Orange Glaze

Whenever bananas began to turn just slightly over-ripe at my house growing up, everyone would try to resist eating them so that they would turn black and fragrant, encouraging my mother to make banana bread.  A while back she ran across a recipe in Southern Living magazine for 'Cream Cheese Banana Bread' with an orange pecan glaze.  This quickly replaced her traditional recipe and has become a family favorite.  


I took that recipe to college and loved baking up two big loaves for my roommates and I, or I'd bake a bunch of mini-loaves to give as gifts.  When I moved to England I began baking this banana bread for my new roommates and now in-laws, who call it 'banana cake'.  I haven't yet found someone who doesn't immediately love it, even if they claim that they don't like bananas. 


Over the years I have reduced the amount of sugar and salt from the original Southern Living version, used wheat flour as part of the flour, added some cinnamon, and I've replaced some of the butter with vegetable oil.  I usually bake the bread without pecans, which are harder to find and more expensive than they are back home.  If you have ready access to pecans, do add them.  I have also successfully made this recipe with gluten-free flour, adding a tablespoon of xanthum gum.  The orange glaze isn't necessary, but it really sets this recipe apart.


This makes two delicious, tall loaves of banana bread.  If you can't finish them up within 4-5 days, freeze one of the loaves up to 3 months for later use.  To thaw, bring to room temperature and defrost for about 4-5 hours.  The bread is also wonderful sliced, toasted under the broiler or grill, and served with low-fat cream cheese.  


Perfect Banana Bread with Orange Glaze 
makes two large loaves


1/2 cup butter
1/4 cup vegetable oil
1 (8oz or 230g) package low-fat cream cheese
1 1/2 cups sugar
2 eggs
2 cups all-purpose flour (or a gluten-free flour blend + 1 tblsp xanthum gum)
1 cup whole wheat flour (or a gluten-free flour blend)
1/2 teaspoon baking powder
1/2 teaspoon baking soda
1/2 teaspoon cinnamon
1/4 teaspoon salt
1 1/2 cups very ripe bananas, mashed (about 4 bananas)
1/2 teaspoon vanilla
1/2 cup toasted pecan pieces (optional)


Preheat oven to 350F/ 175C, and grease and flour two 8x4 inch loaf pans.


Cream butter, oil, and cream cheese until well blended.  Add sugar and mix well.  Add eggs one at a time, beating well after each addition.  


In a separate bowl, mix together dry ingredients.  Slowly stir into the sugar mixture, stirring only until just combined.  Stir in the bananas, vanilla, and, if desired, pecans.  


Spoon into two greased and floured 8x4 inch loaf pans.  Bake at 350F/ 175C for one hour, until a wooden pick stuck into the middle of the loaf comes out with just a few crumbs on it and no dough.  


Set aside to cool for at least 15 minutes.  Loosen sides of pan with a knife and flip the bread out.  While the bread is still warm, top with the orange glaze (see recipe below).  If freezing, allow the bread to cool completely and the glaze to set before wrapping in foil to store.  


Orange Glaze
makes 1 cup glaze


1 cup powdered sugar, sifted
3 tablespoons orange juice
1 teaspoon grated orange rind


Mix ingredients together.  Pour evenly over banana bread while the bread is still warm.  

Monday, August 1, 2011

Couscous, Chickpea, and Vegetable Salad

This mediterranean salad is delicious served warm or chilled.  Lately I've been making it ahead of time, sticking it in the refrigerator for a few hours, then serving it with grilled chicken, shrimp and vegetable kebabs.  It's a filling salad, and it could easily be served as a main dish by adding some sauteed shrimp or chicken before stirring all of the ingredients together.  The variety of vegetables makes this a colorful, healthy, and tasty addition to your summer meal rotation.
Southern Spoon blog: couscous, chickpea, and vegetable salad
Colorful and filling couscous, chickpea, and vegetable salad

Couscous, Chickpea, and Vegetable Salad
5-6 generous servings

1 cup dry couscous
2 1/4 cups boiling water
1 can chickpeas, rinsed and drained
2 green onions, washed and thinly sliced
1/2 purple onion, finely diced
2 carrots, washed, peeled, and shredded
1 bell pepper (any color), washed and finely diced
5 radishes, washed, ends trimmed, and finely diced
1/4 cup finely diced feta cheese
juice from 1 lemon
1 tablespoon extra virgin olive oil
1/4 teaspoon ground sea salt
1/4 teaspoon freshly ground black pepper
1 teaspoon dried oregano
1 teaspoon dried parsley flakes

Place the dry couscous in a large bowl, cover with the boiling water.  Cover, and let stand 5 minutes.  

In a small bowl, whisk together the lemon juice, olive oil, salt, pepper, oregano and parsley, set aside.

Toss the prepared couscous with a fork. Add the vegetables, chickpeas, and feta to the couscous.  Drizzle evenly with the prepared dressing, then toss with a fork until evenly distributed.  

Serve immediately, or refrigerate for at least 2 hours and serve chilled.  

Red Currant and Orange Muffins

The fruit and vegetable stall that I pass every day coming to and from home is showcasing bright red currants right now, and I finally caved and added some to my grocery bags the other day.  I thought about making a red currant cake or tart, inspired by the beautiful pictures on Cannelle et Vanille, but in the end I turned to my favorite quick baking fix: muffins.  
Southern Spoon blog: red currants


I bake a batch of muffins almost once a week, playing with different fruit (or vegetables), flours, and sweeteners.  They're great to have on hand for breakfast, a snack, or dessert, and you can doctor a recipe to make them pretty wholesome and healthy.  If you feel like an entire dozen is too much, bake the whole batch, then place half in a freezer bag or foil and freeze.  To thaw, just heat a muffin in the microwave on high for about 15 seconds.    
Southern Spoon blog: red currant and orange muffins
fresh batch of red currant and orange muffins
This is one of my favorite muffin adaptations, the texture and flavor are wonderful.  I substituted extra virgin olive oil for the usual butter, added orange juice and rind, and used lots of milk and natural yogurt to make a very tender and moist crumb.  The tiny red currants are sweetened by the orange flavors, vanilla, and a combination of natural cane and white sugar.  Make sure to only mix the wet and dry ingredients until just combined-- some lumps of flour may remain.  This way you'll end up with a light, tender muffin.  
Southern Spoon blog: red currant and orange muffins
Around Christmas these would also work well with fresh or frozen cranberries. Enjoy!


Red Currant and Orange Muffins
makes 12 muffins


2 cups all-purpose flour (for some of this you may substitute 1/2 cup or even 1 cup of whole wheat flour if you have it)
2 teaspoons baking powder
1/4 teaspoon baking soda
1/4 teaspoon ground sea salt
1/2 cup sugar (use 1/4 cup refined white sugar and 1/4 cup natural, unrefined cane sugar if you have it)
1 egg
3/4 cups milk
1/4 cup natural, low-fat yogurt
juice and grated zest from 1 large orange (about 1/4 cup juice and 1 1/2 teaspoons zest)
1/4 cup extra virgin olive oil
1 teaspoon vanilla
1 cup red currants


In a large bowl, mix the flour, baking powder, baking soda, and salt.  


In another bowl, use a whisk to mix the sugar and egg well so that you beat some air into the mixture.  Add the egg, milk, yogurt, orange juice and zest, olive oil and vanilla, mixing well with the whisk.  


Pour the wet ingredients into the flour mixture, and stir with the whisk just until combined.  Some lumps of flour may remain.  Add the currants and carefully stir them in, stirring only 2-3 times.  


Divide batter into a greased and floured 12-cup muffin tin.  Bake at 350F/ 175C for 16-18 minutes, until risen and beginning to turn golden brown on top.

Thursday, July 28, 2011

Katie's Carrot Souffle

A very good friend of mine from college had her first baby this week, a healthy little boy.  He's precious, and he does not yet have any idea what a wonderful family he's been born into.  He also has no clue what's in store for his taste buds.  You see, his mom's a great cook, and she simply can't resist baking and cooking delicious food for people to enjoy.  She loves to see their faces light up as they eat a homemade gourmet dinner or a bakery-perfect baked good.  She's always whipping up something creative in the kitchen, which was an advantage for myself and our other roommates in college!  

In honor of my friend and her new addition, I'm sharing one of my favorite recipes of hers, a carrot souffle.  It's similar to a sweet potato souffle, but, rather than heavy or syrupy, this souffle is light and fluffy.  It's also full of vitamin A, good for your eyes!


Southern Spoon blog: Carrot Souffle
Katie's carrot souffle: yum!

I've reduced the butter and sugar from the original recipe to make a slightly lighter souffle. If you have unrefined demura cane sugar or turbinado sugar on hand, use a tablespoon of it as part of your sugar measurement.  This is a delicious side dish to serve for dinner any day, and it's also a great addition to a Thanksgiving or Christmas buffet.  

I've only made this recipe in a round, 1.5 quart dish, but I'm sure it would also work well baked in four or five individual 8 oz ramekins, reducing the cooking time to about 20-25 minutes.  

Katie's Carrot Souffle
5-6 servings

1 lb carrots, washed and peeled
pinch of salt
1/3 cup butter, melted
3 eggs
1/3 cup sugar
3 tablespoons all-purpose flour (or 2 1/2 tablespoons gluten-free flour plus 1 teaspoon Xanthum gum if cooking gluten-free)
1 teaspoon baking powder
1 teaspoon vanilla

Chop the carrots into 1/2-inch coins.  Place them in a pot of boiling water with a pinch of salt and cook for about 15-20 minutes, until tender and a knife cuts through them easily.  Drain the carrots, reserving 2 tablespoons of the cooking liquid, then return them to the pot with the reserved liquid.  


Mash the carrots thoroughly with a potato masher until smooth (or blend with a food processor or blender), then add the melted butter, stirring well to combine.  Add the eggs one at a time, stirring well after each addition.  Whisk  in the remaining ingredients, stirring until just combined.  


Pour into a lightly greased 1.5 quart baking dish.  Bake at 350F/ 175C for 40-45 minutes, until about doubled in size and the middle looks set.  Serve immediately, or chill overnight and re-warm in a hot oven (covered with foil) or microwave before serving.

Tuesday, July 26, 2011

Ceviche-Style Tacos

Ceviche!  Fun to say, and even more fun to eat.  Ceviche is a wonderful Peruvian dish of raw fish 'cooked' with citrus juice and mixed with peppers and vegetables.  The fish is not actually cooked, but it does turn firm and opaque when it marinates in the citrus juices.  I had frozen fish on hand, so I poached the fish for 5 minutes first, but if you have ready access to very fresh fish, do use that instead.

Southern Spoon blog: Ceviche-Style tacos
Colorful ceviche ready to serve with mini homemade tortillas
Ceviche is often served with tortilla chips, but I've recommended serving this recipe with small homemade tortillas so that guests can make mini tacos.  To complete the meal, peel a sweet potato and slice it into 1/2-inch thick slices, boiling the slices for about 10 minutes until tender.  Arrange the warm sweet potato slices on each plate, and add a salad of chopped mango and kiwi fruit.  The flavors go beautifully with the ceviche, and make for a filling dinner.  


This is perfect for a summer meal, and especially fun for a dinner party.  Serve the ceviche in individual wine or martini glasses garnished with a lime.  Set a glass on each plate alongside a short stack of mini tortillas, boiled sweet potato slices, and mango and kiwi fruit salad.  Enjoy!

Ceviche-Style Tacos
4-5 generous servings

4 white fish fillets (such as tilapia, haddock, or halibut), frozen, or very fresh
1 lemon
1 lime
1 small red onion, thinly sliced
2 pickled onions, finely diced
2 carrots, peeled and very finely chopped
2 bell peppers, any color
2 hot peppers (such as jalepenos or serrano peppers)
1-2 teaspoons hot sauce (Tabasco or Cholula)
2 teaspoons extra virgin olive oil
pinch of salt
1/4 teaspoon pepper
2 avocados

To serve:
4-inch tortillas (make sure they're gluten-free if cooking g-f) 
additional lime slices

If you're using frozen fish, bring a large pot of water to a boil, and poach the fish for 5-6 minutes, until opaque.  Remove fish and coursley chop into 1/2 inch pieces.  Arrange pieces in a shallow glass or ceramic dish with a cover.  Grate the lemon rind and squeeze the juice from half of the lemon over the fish.  Grate the lime rind and squeeze the juice from half of the lime over the fish.  Sprinkle with pepper. Cover the fish and refrigerate for 2-3 hours, or overnight.  

Wash and cut the bell peppers in half.  Broil the pepper halves, skin side up, under a hot oven broiler for about 5 minutes, until beginning to blacken on top.  Turn the halves over and broil, insides up, for about 5 more minutes.  Remove from oven and place in a plastic back so that they steam for a few minutes.  After they've steamed, peel off any blacked skin and discard skin.  Shop coursely and place into a large bowl.  

Add the purple onion, pickled onion, carrots, and peppers to the bell peppers.  Add 2 teaspoons olive oil, 1-2 teaspoons hot sauce, the remaining juice from the lemon and lime, and pinch of salt, tossing to coat.  Refrigerate for 2-3 hours, or overnight.

After the fish and vegetables have chilled, dice the avocado.  Add the avocado and fish to the vegetable mixture, stirring gently to incorporate.  Serve immediately.

Serve with mini tortillas and lime slices so that guests can fill their tortillas with ceviche to construct mini-tacos.  If serving gluten-free guests, make sure the tortillas are gluten-free corn tortillas.

Monday, July 25, 2011

Raisin Scones

We had some Texan friends visiting this week and made sure to introduce them to a few English delicacies.  Fish and chips with mushy peas at our favorite pub was included on the list, and they were even brave enough to try marmite on hot buttered toast! 


On their last day here, I baked up a big batch of these raisin scones to serve for tea.  They are light and soft, rather than the dense and hard scones you're often served in a cafe.  


These are best eaten on the day they're made.  Serve with stirred clotted cream (or butter if clotted cream isn't readily available) and strawberry jam. 


Raisin Scones
makes about 20 scones


2 cups all-purpose flour
1/2 cup whole wheat flour
4 teaspoons baking powder
1/4 teaspoon baking soda
1 tablespoon sugar
1/4 teaspoon salt
3 tablespoons butter
1/2 cup raisins
3/4 cups milk
1/2 cup cold water


Preheat the oven to 375F/ 190C.  Grease a 9x9 inch metal baking pan.


Mix the flours, sugar, baking powder, baking soda, and salt in a bowl.  Cut in the butter with a pastry cutter or two knives.  Stir in the raisins.  Add the milk and water, tossing with a fork just until the mixture comes together (it will be pretty sticky, as if it has too much liquid).  


Turn dough out onto a liberally floured surface.  Knead about 10-15 times, adding more flour as necessary to keep the dough from sticking to the surface.  


Roll out to a 1 inch thickness.  Cut out circles with a 1.5 or 2 inch round cookie or biscuit cutter.  Place the rounds so that they are touching each other in the greased baking pan.  Brush the tops with a little milk.


Bake at 375F/ 190C for about 12-15 minutes.  Serve immediately with butter (or clotted cream, freshly stirred) and jam.  

Thursday, July 21, 2011

Herbed Tart with Eggplant, Marinated Sardines, and Mozzarella

In trying to incorporate more Mediterranean food into my cooking, I've enjoyed experimenting with sardines.  They're less salty than anchovies, full of protein and healthy omega 3s, and they are less 'fishy'-tasting than you'd imagine.  


For this savory tart, I marinate the sardines in herbs and olive oil, creating a filling and delicious addition to the eggplant, bell peppers, mushrooms, and creamy mozzarella.  Fresh and dried herbs are used in the crust and the tart filling to intensify the flavour.  It's a beautiful dish to serve to company, and even less-adventurous eaters will be asking for seconds.


Make one large tart or divide the mixture into small tart dishes for individual servings.  Serve with crusty french bread and a side of steamed asparagus tossed in a spoonful of melted butter and squeeze of lemon.
Snapped a picture just before the tart went into the oven 


Herbed Tart with Eggplant, Marinated Sardines, and Mozzarella
Serves 4


Marinated sardines:
3 tablespoons extra virgin olive oil
pinch of crushed sea salt (omit if sardines are canned in brine)
1/4 teaspoon fresh ground black pepper
1 teaspoon fresh thyme leaves 
1 teaspoon dried oregano
1/2 teaspoon coriander (cilantro) seeds, slightly crushed
1 clove garlic, thinly sliced
2 cans sardines, in olive oil or brine, preferably boned and skinned


Tart Crust:
1 cup all-purpose flour
1/2 cup wheat flour
1 1/2 teaspoons baking powder
pinch of salt
1/4 teaspoon fresh ground black pepper
1 teaspoon dried oregano
1/2 teaspoon fresh thyme leaves
1 1/2 tablespoons olive oil
1/4 cup plus 2 tablespoons cold water


Tart filling:
2 eggplants, thinly sliced
1/4 teaspoon salt
2 teaspoons dried oregano, divided
2 green onions, washed with both ends trimmed
1 red bell pepper, sliced
3/4 cup sliced mushrooms
2 cloves garlic, thinly sliced
2 balls reduced-fat mozzarella
8-10 fresh thyme sprigs
1/4 teaspoon fresh ground pepper
2-3 tablespoons freshly grated parmesan cheese


Mix all of the marinade ingredients (except for the sardines) in a small bowl.  Rinse the sardines and then place them in the bowl of marinade.  Cover and refrigerate at least 20 minutes, or overnight.


In a large bowl, mix the dry ingredients for the crust. Cut in the olive oil using a pastry cutter, then add the water, cutting with the pastry cutter until it is just all sticking together.  Turn the dough onto a sheet of plastic wrap or a plastic bag, wrap the plastic around it tightly to form a ball, and place in the fridge for at least 20 minutes, or overnight.


Spray a baking pan lightly with oil, and arrange the eggplant slices on top in a single layer (you might have to do two trays).  Sprinkle eggplant lightly with salt and 1 teaspoon dried oregano.  Place the two green onions on the baking sheet, as well.  Bake at 390F/ 200C for 10-15 minutes, until beginning to brown.  


Remove the tray from the oven, setting aside the green onion.  Stack the eggplant slices together, and place them in a plastic bag so that they can soften in the steam for about 10 minutes.  


Lightly spray a 10-inch tart pan (or 5 4-inch tart pans) with oil.  Remove the dough from the fridge, and place it between two sheets of plastic wrap, or in the middle of a large plastic bag.  Roll out as thinly as you can with a rolling pin (into one large disk, or 5 small discs, depending on the size of your tart pan).  Lay the dough in the tart pan, and press the dough out and up the edges of the pan with your fingers if you need to.


Bake crust for 10 minutes at 390F/ 200C.  Remove from oven.  


Arrange thin, halved slices of the mozzarella on top of the crust, placing the pieces of cheese about 1 inch apart.  Arrange one layer of eggplant slices on top of the mozzarella, then top with another layer of mozzarella.  Add another layer of eggplant, then arrange mushroom slices on top of the second eggplant layer.  


Using kitchen shears, cut the roasted green onions into thin slices over the mushrooms, then sprinkle evenly with garlic slices.  Arrange marinated sardines and bell pepper slices around the tart.  Sprinkle with the fresh thyme sprigs, fresh ground pepper, and remaining 1 teaspoon of oregano.  Top evenly with freshly grated parmesan.


Bake at 390F/ 200C for about 15-20 minutes, until the edges of the crust just begin to turn golden and the cheese is melted.  


Serve immediately or at room temperature.

Thursday, July 14, 2011

Nancy's Famous Peach Cobbler

Today is my mother's 60th birthday, and I wish that I were in the same country so I could celebrate with her tonight.  My mother is an incredible cook, a true SouthernSpoonBelle.  Growing up there was always a delicious meal laid out each evening at home, so that dinner time was a chance for the family to sit back, dig in, and catch up on the day's activities.  I am so grateful to my mother for creating that memorable space for us each evening, centered around a wholesome, homemade meal.

On special nights there would be dessert.  Oh, can my mother make a good dessert.  Brownies, cookies, cakes, pies, cobblers, homemade ice cream... without fail, they are always delicious. Her peach cobbler, in fact, is proven so: voted best dessert at a Baptist church bake-off a few years ago.  That's high praise.

She started making peach cobbler in the summers, after our family would bring back crates of peaches to the house following our annual peach-picking outing.  She would make a fresh cobbler and homemade vanilla ice cream so that we could enjoy our spoils, then she'd skin and slice the rest of the peaches.  I'd often stand at the kitchen sink to catch the peach skins as they coiled off of her paring knife, not wanting any bit of the fruit to be thrown away!  The fresh peach slices would then be piled into freezer bags, ready to be made into cobbler anytime we felt like it, even in mid-winter.
Southern Spoon blog: peach cobbler
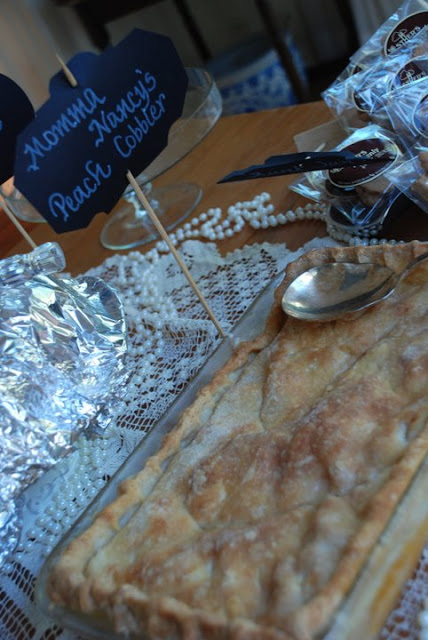
Mom's peach cobbler on the dessert table at my brother's wedding...
 picture courtesy of my talented cousin!
This cobbler is so good that my brother and his wife requested it to grace the dessert table at their Louisiana Southern-plantation-style wedding recently.  They served a selection of their favorite family sweets to guests, and Momma Nancy's Peach Cobbler was a hit.  If I haven't convinced you yet, try it yourself... just make sure to use peaches that are in-season and ripe.  Mother's homemade vanilla ice cream is the best accompaniment, but store-bought vanilla ice cream will do.  Enjoy... and Happy Birthday to Nancy!

Nancy's Famous Peach Cobbler 
Serves about 10

Cobbler Crust: 

3 cups flour
1 1/2 tsp. salt
1 cup crisco
9-10 tblsp. ice water

Cut the salt and crisco into the flour with a pastry cutter or two knives.  Add half of the ice water, sprinkling it over the dough, toss the dough with a fork, then add the other half of the water, cutting with your pastry cutter or knives just until the mixture comes together.

Divide dough in half.  Cover half of dough in plastic wrap and place in the fridge.  On a lightly floured surface, roll out the other half of the dough to about a 1/4 inch thickness.  Cut the dough into long strips, about 3 inches by 1 inch.  Place the strips of dough on a cookie sheet and bake at 425F/ 220C for about 7-10 minutes, until barely brown.

Cobbler Filling: 

1/2 cup butter
9 ripe peaches, peeled and sliced
1 1/2 cups water
1 1/2 cups sugar
2 tblsp. flour
dash of cinnamon
pinch of salt

Mix the butter, peaches, and water in a saucepan over medium-high heat, and bring to a boil.  In a separate bowl, blend the dry ingredients, then stir them into the boiling mixture.  Stir until dissolved, about 5 minutes, then remove from heat.

Remove the reserved dough from the fridge.  On a lightly floured surface, roll out to about 1/4 inch thickness in a 10x10 inch square.

Grease and flour a 9x9 inch baking pan or glass dish (glass works best).  Place one layer of the cooked crust strips on the bottom of the pan, top with half of the peach mixture.  Place another layer of the cooked crust strips on top of the peach mixture, then top with the remaining peach mixture.  Top the cobbler with the rolled out dough.  Press the dough with your fingers to the edge of the pan to seal.  Cut slits or a decoration in the dough (Mother cuts a seasonal decoration, initials, or a giant peach shape-- get creative!).

Place the pan on top of a larger pan or cookie sheet with a lip to catch any drips.  Bake at 375F/ 190C for 35-40 minutes, until the peach mixture is bubbling and the crust is beginning to brown on top.  Serve immediately with ice cream.  Can be refrigerated up to a week or frozen up to 6 months, sealed snuggly with foil.

Thursday, July 7, 2011

Southern Stuffed Bell Peppers over Seasoned Greens

Currently eating this as lunch leftover from last night's dinner, and it's just as delicious the next day.  Black-eyed peas and shredded turkey or chicken, simmered in liquid smoke, come together beautifully in colorful roasted bell peppers.  Served over seasoned greens, topped with shredded cheese, and accompanied by cornbread, this dish couldn't get any more Southern. 

It's healthy and filling comfort food, fit for a family dinner, but a casserole dish full of stuffed peppers also makes a nice presentation on a buffet.  Put the tabasco sauce on the table for anyone who wants to spice it up a notch.  
Southern Spoon blog: Stuffed bell peppers over seasoned greens
Southern stuffed bell peppers over seasoned greens... black-eyed pea goodness
Southern Stuffed Bell Peppers over Seasoned Greens

4 hearty servings

4 bell peppers, various colors
3 tablespoons olive oil
3 tablespoons white wine vinegar
3 teaspoons cumin, divided
2 teaspoons chili powder, divided
3 chicken or turkey breasts (or about 1 1/2 cups shredded, deli-roasted chicken)
1 yellow onion, diced
1 can black-eyed peas, rinsed and drained
1 teaspoon dried parsley
1 teaspoon dried oregano
2-3 cloves garlic, finely chopped
2-3 teaspoons natural liquid smoke (mesquite flavor works well)
4 cups spinach, rinsed
1 cup freshly shredded low-fat cheddar cheese
salt and pepper

Turn on your oven broiler to medium-high.  Wash the bell peppers and split each in half, cutting from the bottom to the top of the stem, removing the stem and seeds.  Mix the olive oil, white wine vinegar, 1 teaspoon cumin, and 1 teaspoon chili powder into a small bowl.  Brush the mixture lightly all over the bell peppers, and place peppers, skin side up, on a baking tray.  Reserve the remaining oil and vinegar mixture.  Place bell peppers in the oven, about 4 inches from heat.  Broil for about 3 minutes, then turn them over so that the fleshy inside is facing the heat.  Broil about 3 more minutes, then turn back over so that the skin is facing the heat.  Broil another  3 minutes, just until the skin begins to blister and peppers are softened.  Remove peppers from oven, and turn oven to 400F / 200C. Sprinkle insides with one teaspoon cumin.

Meanwhile, fill a pot with water and bring to a low boil.  Add the turkey or chicken and simmer for about 15 minutes, until a breast sliced open is no longer pink.  Remove from heat, drain the water off, and shred the chicken or turkey with two forks.  Set aside. 

In the same pot, spray a little oil or cooking spray and return to medium-high heat.  Add the chopped onion.  Saute about 6 minutes, until soft and beginning to brown.  Add the garlic and saute another minute.  Remove one heaping tablespoon of the onion garlic mixture and put into reserved oil and vinegar mixture, set aside.  

Add the black-eyed peas and one cup of water to the pot with the remaining onion and garlic.  Add 1 teaspoon cumin and 1 teaspoon chili powder, and the parsley and oregano to peas.  Simmer for about 6 minutes, stirring occasionally.  Add the shredded turkey or chicken, and salt and pepper to taste.  Simmer for about 3 minutes, stirring occasionally, until the water has mostly been absorbed or evaporated.  Remove from heat.  

Spoon the black-eyed pea mixture into each bell pepper half, topping with shredded cheese.  Leave any remaining mixture in the pot that won't fit into the bell pepper halves.  Return the pot to medium heat and add the spinach, stirring occasionally for about 2-3 minutes, until spinach is wilted.  

Pour one tablespoon of the reserved oil and vinegar mixture into the spinach, stirring to distribute.  Pour the remaining oil and vinegar mixture into the bottom of a large ceramic or glass casserole dish.  Spread the spinach mixture over the bottom of the casserole.  Arrange bell peppers on top of spinach.

Bake casserole dish at 400F / 200C for about 15 minutes, until cheese is melted and peppers are heated through.  Serve immediately with cornbread.

Fajitas

I can remember ordering beef ‘fajita’, or skirt steak, at Secos y Mojados, a restaurant across the border in Mexico that my family used to frequent in the summer when visiting relatives in South Padre Island, Texas.  Although it didn’t look like the type of fajita I was used to in San Antonio’s Tex-Mex restaurants, the meat was well seasoned and easy to eat.
onions & bell peppers sizzling away as homemade tortillas cook alongside for fajitas
This is the hubs’s favorite ‘Texan’ meal, and we make it once every couple of weeks for dinner.  Cook up the seasoned beef or chicken with onions and bell peppers, then place the filling in a serving platter on the table and serve with homemade tortillas. Top with sour cream or plain yogurt, fresh shredded cheese, chopped jalapeños or serrano peppers, and chopped avocado.  Good served with corn (cooked with a little finely chopped red or green bell peppers and sprinkled with a dash of cayenne pepper) and refried beans on the side.
Fajitas
Makes 7-8 hearty servings
3 or 4 chicken breasts or thin beef steaks
2 teaspoons fajita seasoning (I use nothing but Fiesta brand Fajita Seasoning)
2 teaspoons vegetable oil
2-3 cloves garlic
1 onion
2 bell peppers, any color

To serve: 

tortillas (gluten-free and/or grain-free if cooking g-f or paleo)
sour cream, plain yogurt, or cashew cream
shredded cheese (optional)
chopped jalepeños or chili peppers
sliced avocado
Sprinkle 1 teaspoon of fajita seasoning on either side of the chicken or beef, and return the meat to the fridge to marinate for at least 30 minutes or overnight.  Finely chop the garlic, and slice the onion and bell peppers into long strips.  Heat the vegetable oil in a wide pan or skillet on high heat.  Add the onion and bell peppers, sprinkling with 1 teaspoon of fajita seasoning, and sauté for about five minutes.
Push the vegetables to one side and add the meat to the pan, searing for about 2-3 minutes on either side.  Turn the heat down to medium-high, redistribute the vegetables, add the garlic, and continue to cook the meat for about 6-7 more minutes, until the chicken is no longer pink in the middle (beef may remain slightly pink). 
Turn off the heat and remove the meat from the pan, slicing thinly across the grain into long strips.  Mix the meat back into the peppers and onions, and transfer to a serving platter.
Serve fajita meat hot alongside tortillas and toppings so that guests can pick up a tortilla, fill it with fajita meat, peppers, and onions, and top with desired toppings. Sour cream or low fat plain yogurt, fresh shredded mild cheese, chopped jalapeños or serrano peppers, and chopped avocado are excellent toppings.

Tortillas

Warm, fresh tortillas are a staple that many Southerners take for granted.  Restaurants throughout the South make their own tortillas, and many grocery stores in Texas make their tortillas on site. By contrast, England’s grocery stores, if they have them at all, stock only overpriced, flavorless ‘wraps’ and packaged tortillas full of preservatives. These are not the real thing, and I refuse to eat them or serve them to guests!
homemade tortillas @ Southern Spoon blog
stack of homemade tortillas ready to serve
This tortilla recipe is very easy. Though they do take a few minutes to mix up, roll out, and cook, they are tasty and you have the assurance of knowing exactly what they contain. If you have masa flour (a Mexican flour made of corn) on hand, use a cup of that as part of the 4 cups of flour called for; if not, use a cup of wheat flour as a part of the flour– it gives the tortillas a more distinct taste.   
homemade tortillas @ Southern Spoon blog
homemade tortillas cooking on my grandmother's griddle
Make sure the griddle is very hot for the first tortilla, or it may stick to the pan. (Trick my mother taught me: fling some water on the pan, if the drops dance across the griddle, it’s hot enough). You may have to turn the heat down a bit after cooking your first few if they start to brown too quickly.
I often cook tortillas on a separate griddle alongside fajita meat, timing it so that I’m finished cooking the last tortilla just as the fajita meat is ready.
Tortillas
makes about 8 tortillas
4 cups flour (or 3 cups flour and 1 cup masa flour; or 3 cups flour and 1 cup whole wheat flour)
1 teaspoon salt
1 teaspoon baking powder
6 tablespoons vegetable oil
1  1/4 to 1 1/2 cups warm water
Mix dry ingredients in a bowl. Cut in oil with a biscuit cutter or a fork. Mix in enough water to form a sticky dough. Turn the dough out onto a lightly floured surface and knead 5 or 6 times, until dough comes together. With floured hands, roll dough into egg-sized portions.  Let the dough portions sit for 15 minutes.
Using a rolling pin or a tortilla press, flatten each dough portion into a thin circle. Cook on a skillet over high heat for about 1 minute on each side or until little dark spots begin to appear and the dough is cooked through.
As you are cooking the tortillas, pile finished tortillas in a tortilla holder or on a plate covered with a dishtowel to keep them warm and soft.
Place any leftover tortillas in a bag in the freezer. To defrost, microwave for about 30-45 seconds on medium-high.