Sunday, May 26, 2013

Chicken & Rice Casserole with Mushrooms & Squash

I debated what to title this recipe. On the way home from work last week, heading to the grocery store, I had an out-of-the-blue craving for squash casserole. I've only had squash casserole a few times in my life-- it's not something we ate regularly as a family, and I've never made it before myself. But I remembered loving the rich flavor the few times I'd had it, totally unlike squash prepared any other way (I detest limp, flavorless boiled/steamed squash). The organic zucchini I spotted piled high on the produce shelves in my swing by the grocery store confirmed the time was right to experiment.

When I excitedly told the hubs I was going to make a squash casserole for dinner, he balked and his eyes grew wide in skepticism. I tried to describe what I was conceptualizing, but the name had ruined it. He was going to have to try it to be convinced. And convinced he was.
chicken & rice casserole with mushrooms & squash @ Southernspoon blog
chicken & rice casserole, with sautéed mushrooms and hidden squash
This is a homely, filling dish packed with flavor, a meal in itself with healthy proportions of carbs, protein, and fresh vegetables. I've basically combined my mom's traditional chicken and rice casserole (always a crowd pleaser, and a regular on our family meal rotation growing up) with a squash casserole = Chicken & Rice Casserole with Mushrooms & Squash. This recipe name will, I hope, be a little more palatable to my fellow diner the next time I feel the urge to make squash casserole for dinner : )

Sautéed mushrooms taste delicious here, and you hardly notice that the recipe contains squash but for the added depth of flavor and creamy texture. The addition of par-steamed broccoli florets, or a few handfuls of fresh spinach leaves stirred through the mixture before baking, would also work well in this casserole and boost the vegetable content. And apologies for the photo-- casseroles like this don't photograph very well (night-time conditions and a measly iphone lens don't help), but don't let that put you off. This is a great option for dinner or a potluck, it's gluten-free, and it's even better the next day as leftovers.
Virginia countryside @ SouthernSpoon blog
The gorgeous property in Virginia where my cousin and his fiancé will be getting hitched tomorrow,
we were lucky to get a personal tour a couple of years ago when driving through the area
My oldest cousin on my dad's side is getting married tomorrow in the rolling hills of Virginia, and tonight there is a big cookout for the rehearsal dinner. (How the hubs and I wish we were in the US to join in the festivities... and sample some of my aunt's family-recipe pies, which will take the place of a traditional wedding cake...yum). My cousin and his bride-to-be have let their guests know that tonight's rehearsal dinner is southern country style, where mac and cheese is a vegetable and the gravy flows like wine. They've asked guests to bring along a dish to add to the table, and if the hubs and I were there, this is just the dish we would bring: hearty, tasty home-cooking at its best.

Chicken & Rice Casserole with Mushrooms & Squash
serves 5

3/4 cup chicken or vegetable broth (make sure it's gluten-free if cooking g-f)
4 cups sliced squash (such as zucchini or patty squash), 1/2-inch-thick slices
1 medium onion, coursely chopped
1 tablespoon extra virgin olive oil
1 cup sliced button mushrooms
3 cloves garlic, minced
2 cups shredded rotisserie chicken
2 cups cooked rice
3/4 cup shredded cheddar cheese
3/4 cup greek yogurt (or plain yogurt)
1 egg, slightly beaten
pinch of freshly ground pepper
pinch of freshly ground sea salt
1 teaspoon dried oregano
1 teaspoon dried parsley
2 tablespoons grated parmesan cheese

In a medium-sized saucepan over medium-high heat, bring the chicken or vegetable broth, sliced squash, and chopped onion to a simmer. Turn down the heat to medium-low, cover, and simmer for about 15 minutes, until squash and onions are very tender. Remove from heat, mash up slightly with a potato masher or fork, and set aside.  

Heat the olive oil in a skillet over medium-high heat. Add the mushrooms, and sauté for about 6 minutes, stirring occasionally, until mushrooms begin to turn golden brown. Add minced garlic to mushrooms, and sauté for an additional 2 minutes, stirring occasionally. Remove from heat.  

To the mashed squash mixture, add the mushrooms and garlic, shredded chicken, cooked rice, shredded cheese, yogurt, egg, pepper, salt, oregano, and parsley. Stir gently to combine. 

Coat a 13x9 inch pyrex dish (or 2 litre capacity casserole dish) with cooking spray. Spread the squash mixture evenly into the pan, roughing up the top a bit with a fork. Sprinkle the grated parmesan cheese evenly over the top.

Bake at 200C / 390F for about 40 minutes, until hot throughout and bubbly. At the end of baking, turn the broiler (grill) on high, and cook the casserole 4 inches from the heat source for 1-2 minutes, until the top begins to turn golden brown (watch carefully to make sure it doesn't burn). Serve immediately.

Storage Tip: Once baked, this casserole will keep, covered in the fridge, for 3 days. To reheat, microwave till hot, or cover the casserole dish in foil and bake in a 200 C/390 F oven for 20-30 minutes, until hot throughout.

Monday, May 13, 2013

Chicken & Sausage Gumbo (with a paleo-friendly version)

While in Texas last month for work, I was able to have dinner with my siblings and sister-in-law, under the same roof, for the first time in almost two years. It was such a treat, and we took advantage of the few evenings we had together to eat delicious homemade food, drink lots of wine, and catch up with music playing in the background. My fantastic sister-in-law and brother were true to their Cajun roots and prepared an incredible gumbo for me and my sister one night (with zydeco playing in the background, of course).
my brother dishing up gumbo for a sibling dinner in Houston: Cajun-Tex cuisine
This gumbo was FAR better than the recipe that my sister and I had attempted together when she came to visit me and the hubs in London a couple of years ago. We never got the roux right. And the roux is key. The resulting gumbo just didn't have that deep, rich taste, and there was a slightly grainy texture to the stock. My paternal grandmother used to make gumbo every year for all the family who came to visit their Nashville home at Christmas. I have great memories of gumbo dinners at the kids' table with my cousins, and was disappointed to discover how difficult it seemed to replicate the dish. Like the yeast-bread gene, I thought I'd also skipped out on the gumbo gene when my sister and I failed to make a good batch. Following our unsuccessful try, I hadn't attempted gumbo again, sticking to cajun-inspired chicken or pasta dishes, or the easy crowd-pleaser shrimp and grits (need to post that one soon).
Chicken & Sausage Gumbo (no roux!) @ SouthernSpoon blog
delicious gumbo with chicken and sausage, roux-less and gluten-free
But my sister-in-law and brother shared the secret to their roux-less, tasty recipe. By charing the okra, then the onions, and then concentrating the flavor of the spices and broth into the vegetables, you create a wonderful, dark stock that tastes as rich as the finest butter-and-flour roux. In fact, I think the flavor of this gumbo is even better than all of the roux-based gumbo I've had in the past. And I'm pleased to say that it goes over well in the southern hemisphere : ) This gumbo is also gluten-free friendly, and dairy-free, too, since extra virgin olive oil is used instead of butter.
easy and delicious gumbo (no roux!) @ SouthernSpoon blog
easy, rich-tasting gumbo, served with lots of Tabasco
After sourcing locally grown okra (labelled okra beans!) at our nearby grocer, I made a batch of this gumbo over the weekend. It really is an incredibly delicious recipe, and can be adapted to use whatever combination of chicken, sausage, or seafood you have on hand. We used shredded rotisserie chicken and a couple of links of chorizo (no andoille sausage here in Sydney as far as I can tell), but prawns (shrimp) and sausage would also be awesome. We used roasted red bell peppers rather than tomatoes because of allergies to tomatoes, but either will work well. The hubs gave this recipe his highest approval, and strongly recommends you make it as soon as you can. Make sure you have Tabasco on hand. And happy anniversary for tomorrow to my one-of-a-kind brother and sister-in-law, love y'all!

Chicken & Sausage Gumbo
serves 4

1/2 teaspoon ground black pepper
1/2 teaspoon ground sea salt
1/4 to 1/2 teaspoon cayenne pepper (to taste)
1/2 teaspoon smoked paprika
1 teaspoon dried oregano
1 teaspoon dried parsley
1 tablespoon extra virgin olive oil
1 1/2 cup okra, sliced (divided use)
1 medium sized onion, diced
3 cups reduced-sodium chicken or vegetable broth (divided use)
2 red bell peppers, roasted, skins peeled, and diced (or 1 cup chopped tomatoes)
3 cloves garlic, minced
1 cup thinly sliced andoille sausage (or chorizo), uncooked
1 1/2 cups shredded cooked rotisserie chicken
1 cup raw prawns (shrimp), optional

To serve:
1 cup dried rice (or cauliflower rice if cooking grain-free/ paleo: recipe below)
1/4 cup green onions, thinly sliced
Tabasco sauce

In a small bowl, combine the spices (black pepper through parsley) and set aside.  You will gradually add this spice mixture as you prepare the gumbo.

You will first char the okra, then onion, which will help to create a dark, rich roux-like broth for the gumbo. Heat a large saucepan on the stove over high heat. As soon as the pan starts smoking, add the tablespoon of olive oil and swirl to coat the pan. Add half of the sliced okra (3/4 cup) along with a few pinches of the spice mixture. Quickly swirl the okra around the pan to cover with oil and the spices, then leave to sauté for a minute before stirring. You want to char the okra so that it's a bit blacked, but be careful not to burn it through (you may need to turn your burner down to medium-high if your saucepan is thin). Cook okra for 3-4 minutes, stirring occasionally, until evenly charred. Add the onions and a few more pinches of the spice mixture. Again, quickly swirl them around to coat with the oil and spices, then leave for a minute before stirring. Cook for 3-4 minutes, until onion is beginning to brown.

Add 1/2 cup chicken or vegetable broth to the okra onion mixture to deglaze the pan. Scrape the bottom of the pan to remove all of the blackened bits. Cook until all of the liquid has evaporated, about 3-4 minutes, stirring occasionally and scraping the bottom of the pan.

Add the diced roasted bell peppers and the minced garlic with another few pinches of the spice mixture. Stir occasionally, scraping the bottom of the pan, until all of the liquid has evaporated (2-3 minutes). Now add 1/2 cup of chicken or vegetable broth, and cook, stirring occasionally and scraping the bottom of the pan, until all of the liquid has evaporated (5-6 minutes).

Add the remaining 2 cups of vegetable or chicken broth, the sausage, and a few more pinches of the spice mixture. Cover, turn heat down to medium-low, and simmer for 40 minutes.

Prepare the rice according to package directions, set aside and keep warm. (Or prepare cauliflower rice as per recipe below).

After simmering the gumbo for 40 minutes, add the shredded, cooked chicken and the remaining 3/4 cup sliced okra. (At this point, taste the gumbo and, if necessary, add the remaining spice mixture.)  After added the chicken and remaining okra, simmer for 15 minutes. If using prawns (shrimp), add them at the end of the 15 minutes, and simmer for an additional 4-5 minutes, just until prawns turn completely pink.

To serve, place a 1/2-cup mound of rice (or prepared cauliflower rice) in the centre of each bowl, and ladle gumbo over the rice. Sprinkle with the sliced green onions, and serve immediately, with Tabasco on the side.

Cauliflower Rice
serves 3-4

1/2 large head of cauliflower, rinsed thoroughly
1 tablespoon olive oil (not extra virgin) or melted coconut oil
pinch of freshly ground salt

Grate the cauliflower florets on a grater (the side with the large holes), or process the florets gently in a food processor, until you have a pile of cauliflower 'rice grains'. (You will have between 2 1/2 to 3 cups).

Place a medium sized saucepan over medium heat, and add the oil, swirling to coat the pan. Add the cauliflower, and cook, stirring occasionally, for 6-8 minutes, until cauliflower is cooked through but still a bit crisp-tender. You may speed up the cooking process by covering the pan with a lid and steaming for 4-5 minutes. Watch that the cauliflower doesn't burn, and turn the heat down to low if necessary to prevent burning.

Remove cauliflower from heat and stir in a pinch of freshly ground sea salt, and serve.

Variations: Before adding the cauliflower, sauté a 1/4 cup chopped onion and a teaspoon of minced garlic. You may also add your favorite herbs and seasonings to vary the flavor of your cauliflower rice. A pinch of tumeric, with sautéed onion and garlic, makes a delicious cauliflower rice that is well suited to Indian dishes.

Monday, May 6, 2013

Quickbread Cinnamon Rolls with Walnuts & Golden Syrup

I can't do yeast bread. I should practice more often. I should make sure the yeast I have hasn't expired every time I try to use it. But really I just prefer quickbreads. They're a sure thing. Baking powder and baking soda and that's all the leavening you need.

My great-grandmother, Mamaw, who lived in a tiny Louisiana town until she peacefully passed out of this world at the age of 101, was renowned for her yeast rolls. These perfect, light, flaky things were like a cross between a biscuit and a dinner roll, just incredible. We used to eat them by the basketful at dinners in her little white clapboard house on the sweet potato farm that was run by her husband, then their son (my great uncle), and his son after that. My dad (Mamaw's grandson) and his sisters and cousins still speak with reverence of the times she would make those rolls and cover them in a homemade, cocoa-based chocolate sauce. Then they became *chocolate rolls*, and were apparently the most delectable things any of them had ever tasted. I never had the chocolate version, but Mamaw's rolls original-recipe-style were heaven on earth. My mom does a pretty authentic rendition of Mamaw's rolls, and my aunt can make a delicious version of the chocolate rolls. But something about Mamaw's method made those rolls irreplaceable.
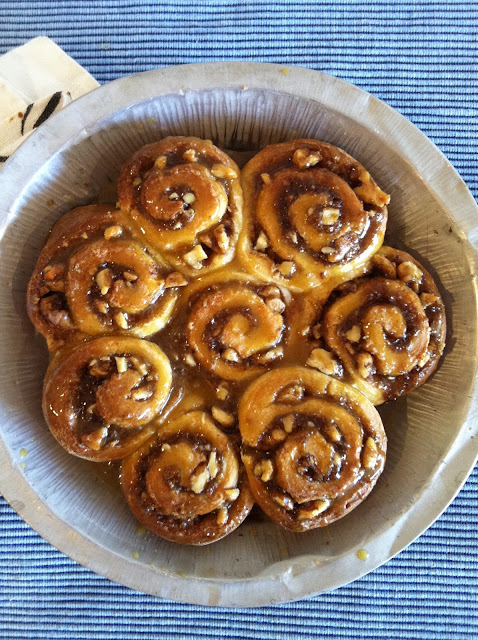
quickbread cinnamon rolls with walnuts & golden syrup @ SouthernSpoon blog
quick, delicious cinnamon rolls with walnuts and golden syrup
 I didn't get the good-at-yeast-rolls gene. But I love dinner rolls and breakfast rolls of all sorts. So when I saw a recipe on Vintage Mixer for one-hour cinnamon rolls, and realized they didn't require yeast, I had to experiment. I made a smaller batch and adjusted a few ingredients, making them less sugary-sweet but imparting the rich flavor of golden syrup. Golden syrup is a British staple, and is readily available here in the Antipodean colonies. It's beautifully thick and amber-colored, with a slightly roasted, almost buttery flavor. You can probably find golden syrup in many North American grocery stores, but, if it's unavailable, maple syrup or agave syrup will do fine. These cinnamon rolls are incredible, delicious and flaky just like their yeast-roll counterparts, but without the stress of using the yeast correctly, waiting for dough to rise, etc. I've found the perfect breakfast sweet roll recipe, and I think Mamaw would approve. Thank you Vintage Mixer! Play around with filling combinations to change it up (as if you'll tire of the perfect combo of cinnamon and walnuts), but this simple quick-bread base is a keeper.
quickbread cinnamon rolls with walnuts & golden syrup @ SouthernSpoon blog

I used walnuts in these cinnamon rolls, but pecans would also work well, as per the original Vintage Mixer recipe. I halved the recipe and still managed to make eight smaller (2-3 inches wide, 1.5 inches thick) cinnamon rolls, and they fit perfectly into an 7-inch pie pan. I also rolled the dough thinner, to about 1/4 inch, which allowed for a more cinnamon-filling to roll ratio. If you like a thicker cinnamon roll you can roll the dough to 1/2-inch thickness, though this will yield fewer rolls. Double the ingredients for a larger batch, cutting the rolls a little thicker (2 inch increments instead of 1 inch), baking the rolls in a 9-inch square pyrex dish or metal baking tray, and adding 5-10 minutes to the baking time to ensure the middle rolls cook through. These rolls can also be prepared the day before, covered and stored in the fridge overnight, and baked fresh the next morning.

Bake these fast and easy quickbread-based cinnamon rolls for birthday mornings, holidays, or any time you feel like treating yourself and your loved ones to a sweet breakfast treat.

Quickbread Cinnamon Rolls with Walnuts & Golden Syrup
makes 8 (2-3 inch) cinnamon rolls
adapted from Vintage Mixer

Quickbread Dough
1 1/2 cups flour (I used a 1/2 cup whole-wheat flour and 1 cup all-purpose flour)
1/2 teaspoon baking powder
1/4 teaspoon baking soda
small pinch of freshly ground sea salt
1 tablespoon unsalted butter, melted (or extra virgin olive oil)
1/2 cup milk (any fat content is fine)
2 tablespoons golden syrup (or maple syrup, or agave syrup)

Cinnamon-Walnut Filling
3 tablespoons brown sugar
1/3 cup coursely chopped walnuts
1 teaspoon ground cinnamon
small pinch of freshly ground sea salt
1 tablespoon unsalted butter, melted (or extra virgin olive oil)

Golden Syrup Icing
1 tablespoon unsalted butter, melted
1 tablespoon golden syrup (or maple syrup, or agave syrup)
2 tablespoons sifted powdered sugar (confectioners' sugar)
1 teaspoon milk (or any dairy-free milk)

First make the dough. In a large bowl, combine the flour, baking powder, baking soda, and salt. In a small bowl, lightly whisk the melted butter (or olive oil), milk, and golden syrup. As the golden syrup is so thick, I found it easier to microwave the butter, milk, and golden syrup together for about 15 seconds, then whisk them together. Pour the liquid mixture over the flour mixture, and stir well to combine. Turn the dough out onto a lightly floured surface, and knead for 2-3 minutes, until dough is smooth. Place dough in the fridge for about 20 minutes (or the freezer for 10 minutes).

Make the filling while the dough chills. In a small bowl, combine the brown sugar, walnuts, cinnamon, and sea salt. Pour 1 tablespoon of the melted butter (or olive oil) over the cinnamon sugar mixture, and stir to combine.

When the dough has chilled a bit, remove from fridge and place on a very lightly floured countertop. Roll the dough to 1/4 inch thickness for skinnier cinnamon rolls, or to 1/2 inch thickness for thicker cinnamon rolls. I rolled mine out to about a 7x10-inch rectangle. Spread 1 tablespoon melted butter (or olive oil) evenly over the dough. Evenly sprinkle the cinnamon-sugar mixture over the top of the buttered dough, and press the mixture in lightly with your hands. Starting from the long end, carefully and tightly roll the dough.

Slice the rolled rope of dough into 8 sections (so that each section is about 1 inch thick). Place the rolls into a greased 7-inch round cake tin or pie dish, arranging them so that the seams of the rolls are facing toward each other and not towards the outside of the pan. Bake in a pre-heated oven at 220C/ 425F for about 18-22 minutes, until the middle roll looks done and they are beginning to turn golden brown. Remove from oven and cool for a couple of minutes before drizzling the icing over the tops. Serve warm.

For the icing, combine 1 tablespoon melted butter and 1 tablespoon golden syrup in a microwave-safe bowl, and microwave for about 10-15 seconds on high. The golden syrup should now be less viscous and closer to maple-syrup consistency. Stir in the two tablespoons of sifted powdered sugar, and, if necessary, thin out with 1 teaspoon of milk (or your choice of dairy-free milk). Stir well, then drizzle over the warm rolls, spreading the mixture around the tops a bit to evenly coat the rolls.

*Preparation tip: if you are clumsy with transferring ingredients back and forth across various countertops in your kitchen, make sure to use metal bowls so that when you drop them, you only have to vacuum up brown sugar and walnuts, not broken glass:
#southernspoonfail
the hubs kindly vacuumed up the cinnamon-sugar-walnut-melted butter mess
while I attempted to finish the cinnamon rolls with minimal ingredient casualties

Saturday, May 4, 2013

Chorizo & Shrimp Tortilla Bisque

Happy almost Cindo de Mayo! This date originally marked a battle victory by Mexican soldiers over the French in the 19th century, but Cinco de Mayo has since been taken up by Mexicans and Mexico-lovers across the US to celebrate Mexican pride and culture. Growing up in south Texas, Mexican culture was a big part of our regional identity, and my home town regularly celebrated Mexican and Tex-Mexican holidays in style. The color, cheer, and community enthusiasm of these events made a lasting impression. Every April-May, the time of San Antonio's city-wide Fiesta, shortly followed by Cinco de Mayo, I get a little nostalgic for my Tex-Mex roots. But a Mexican food dinner (fajitas; ceviche tacos?!) with a corona or margarita quickly recalls these vibrant celebrations.

We've got some amigos together to hit the town tonight to mark Cinco de Mayo and try out a new restaurant in Sydney's Surrey Hills: Mexico Food & Liquor. The atmosphere looks great, the food looks fresh and creative, and there are 70+ tequilas on the menu. Fantastico! I might be most excited about the buñuelos with xocolate and pinenut crema. I haven't had Mexican buñuelos in forever. They can best be described as large, fried tortillas, dusted with cinnamon and sugar. My mom used to bring big, crispy stacks of them home from a nearby Mexican bakery, and one of my favorite Tex-Mex restaurants in San Antonio used to serve their huevos rancheros with a side of fresh fruit placed in a little buñuelo bowl. Yum.

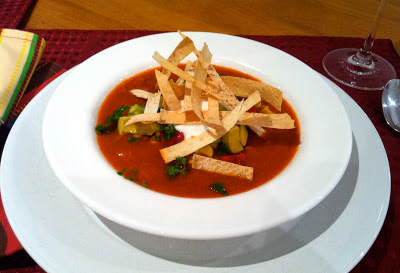
chorizo & shrimp tortilla bisque @ SouthernSpoon blog
Tortilla-style soup: a thick bisque of roasted bell peppers, shrimp, and chorizo,
topped with corn, roasted peppers, avocado, fresh herbs, sour cream, and crispy tortilla strips
We got into the Cinco de Mayo mood last night with a sort-of tortilla soup dinner. I ended up creating more of a thick puree rather than a broth-based soup, and we used shrimp and chorizo rather than the typical shredded chicken. The only tortillas are crisped up and served on top as a garnish, rather than stirred into the broth like a traditional tortilla soup. So this really isn't tortilla soup at all. It's a spicy roasted bell pepper bisque with shrimp, chorizo, and a generous portion of Tex-Mex tortilla soup-themed garnishes. But you'll love it, and it goes down well with either wine or a light Mexican beer.
chorizo & shrimp tortilla bisque garnishes @ SouthernSpoon blog
garnishes ready to serve with chorizo & shrimp bisque
We have allergies to tomatoes in this house, so the roasted bell peppers were a great substitution for the tomatoes in traditional tortilla soup. If you're short on time, just use a drained can of peeled tomatoes instead of the roasted bell peppers, and you could also substitute a 1/2 cup of corn cooked from frozen for the fresh corn on the cob. To make the bisque vegetarian, replace the chorizo and shrimp with a can of drained black beans, stirring them into the soup at the end as you heat it over the stove. The chorizo isn't strictly necessary, but adds great flavor and texture to this bisque. Happy eating, and enjoy your fifth of May whether or not you celebrate Tex-Mex style!

chorizo & shrimp tortilla bisque @ SouthernSpoon blog
delicious chorizo & shrimp tortilla bisque

Chorizo & Shrimp Tortilla Bisque
serves 3 as a main dish, 6 as a starter or side dish
adapted from Jeanine Donofrio of Love and Lemons at Camille Styles

4 large red and yellow bell peppers (I used 3 red and 1 yellow; divided use)
1 brown onion
3 garlic cloves (whole, unpeeled)
1 jalapeño or chili (I used a bird's eye chili)
1 large ear of corn on the cob, green leaves and silks removed
3 cups vegetable or chicken broth
1/2 to 1 teaspoon ground cumin
1/2 to 1 teaspoon smoked paprika
dash of cayenne pepper
1/4 cup coursely chopped fresh parsley
1 cup shrimp (peeled and deveined; raw or cooked)
1 small link cooked chorizo sausage, coursely chopped or crumbled (about 1/3 cup)
1 lime
small pinch of freshly-ground sea salt

To Serve: 
1 tortilla (use a gluten-free corn tortilla if cooking g-f)
1/4 cup sour cream or plain greek yogurt (cashew cream if cooking dairy-free?)
1 avocado, coursely diced
1/4 cup of the above red bell peppers after you've roasted and peeled them
Cholula or Tabasco hot sauce (to serve)

Preheat oven to 230C  / 450F.

Chop each bell pepper lengthwise into three large sections, and peel and chop the onion into quarters. Slice jalapeño in half lengthwise and de-seed. Place the chopped peppers, onions, jalapeño, and unpeeled garlic cloves on a large baking tray and place in oven. Roast for 20-30 minutes (removing jalapeño and garlic cloves after 10 minutes so they don't burn), until outer layers of onions begin to brown and the skins of the bell peppers are bubbling and beginning to blacken.  As soon as you remove the the onions and peppers from the oven, place peppers into a pyrex or glass bowl and cover with a lid or plastic wrap for at least 5 minutes.

Slice the tortilla into thin strips. Place strips on a baking tray and bake in the oven at 230C/ 450F for 3-4 minutes, until crispy but not browned. Remove baked tortilla strips and set aside for garnish.

While the onions and peppers are roasting, bring a large pot of water to a boil and place the corn cob into the pot. Cover and simmer for about 10-15 minutes, until corn is tender. When the corn is done, drain and discard the water, remove corn cob, and let it cool for a couple of minutes. Reserve pot for cooking the soup. When the corn cob is cool enough to handle, carefully scrape the corn kernels off of the cob with a knife. Set corn kernels aside, and discard cob.

Remove the roasted bell peppers (now cool enough to handle) from the glass bowl, and carefully peel off and discard the skins. Coursely chop the peeled peppers, setting aside about 1/4 cup of chopped peppers for garnish.

Place the remaining chopped peppers into a blender, along with half of the cooked corn kernels (keep the other half of the corn kernels for garnish). Squeeze the roasted garlic cloves out of the skins and add the garlic to the blender. Coursely chop the roasted onions and jalapeño and add them to the blender. Pour two cups of broth into the blender. Add to the blender 1/2 teaspoon ground cumin, 1/2 teaspoon smoked paprika, dash of cayenne pepper, and half of the chopped parsley (1/4 cup). Blend pepper mixture until you have a smooth puree.

Pour pureed pepper mixture into a large pot (same one you used to cook the corn), and bring to medium heat on the stove. Add to the pureed pepper mixture the shrimp, chopped chorizo, half of the chopped parsley, and the juice from half of the lime. (Set aside the remaining half of the parsley for garnish, and slice the remaining half of the lime into 3 wedges for garnish). Heat the bisque until hot throughout, about 5-10 minutes, stirring occasionally.  If you are using raw shrimp, make sure to cook the bisque until the shrimp turn pink and are cooked through. Taste the bisque, and, if desired, add up to an additional 1/2 teaspoon each of ground cumin and smoked paprika, and a small pinch of freshly ground sea salt.

While the bisque is heating, prepare the garnishes. Place each garnish on a large serving tray or into separate small serving bowls: the roasted and chopped bell peppers, chopped parsley, corn kernels, lime wedges, chopped avocado, sour cream (or greek yogurt), and crispy tortilla strips. Place garnishes on serving table with small serving spoons or forks, along with Cholula or Tabasco hot sauce.

Ladle hot bisque into bowls and serve immediately, allowing guests to top their own bisque with the garnishes.

Bisque will keep for two days in the refrigerator.